


Dapp应用层要做什么
Dapp应用层最主要的是实现用户侧的交互逻辑,包括web页面和页面事件响应。同时不同的操作会带来不同的事件,我们还需要针对页面事件去调用后端智能合约方法,存入便签、更新便签、读取便签等。 由于是基于React框架做的实现,我们首先要准备一套Dapp应用层的开发环境。
Dapp应用层开发环境准备
- 首先需要安装nodejs环境,本文采用的是v9.11.2版本,npm版本为v5.6.0。我们可以使用nvm安装,也可以通过系统自带的包管理安装。具体的下载安装方法这里不再赘述,可参考官方文档:Node.js下载安装指导
- 准备好nodejs和npm环境后,我们可以一键创建一个React项目。根据不同的环境,我们有两种命令。
$ npx create-react-app notewall-dapp
or
$ create-react-app notewall-dapp
- 执行完之后,我们可以进入notewall-dapp目录,目录里是一个标准的未装任何依赖的项目目录。这个项目里我们需要安装如下依赖:
$ cd notewall-dapp
$ npm install --save react-toastify react-bootstrap axios
其中react-toastify是一个第三方的弹窗通知库;axios是一个http请求库,完成我们对合约网关的请求。
- 试着启动一下
$ npm start
npm会启动这个react项目,并且将http server监听在本地3000端口。浏览器访问http://localhost:3000可以查看结果。
如果我们看到了如下页面显示,则代表项目环境初始化完成。
为了能让项目运行我们的便签,我们需要更改根目录的App.js如下。
/**
 * @file notewall app entry
 * @author XUPERBAAS Team
 */
import React, {Component} from 'react';
import './App.css';
import NoteWall from './note/NoteWall.js';

export default class App extends Component {
    render() {
        return (


);
    }
}
Dapp应用层开发
如上所述,Dapp应用层主要分为两大部分,一个是页面展示与交互逻辑,另一个是与智能合约的交互。与传统web应用需要后端服务器不同的是,Dapp应用层只需要前端部分,Dapp的后端是区块链节点。我们通过调用以太坊节点上的接口向智能合约发起调用。而这些调用全部需要在前端Javascript中完成。
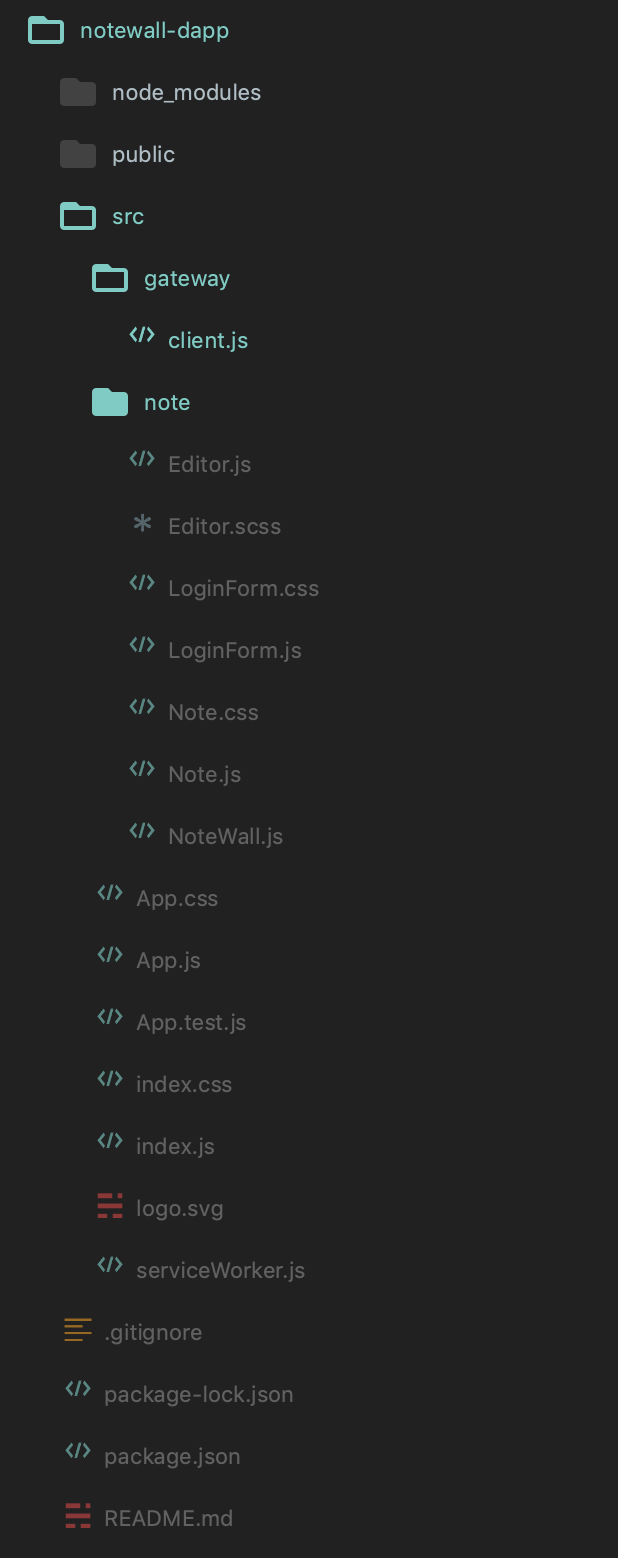
我们可以规划项目目录,新建两个子目录分别为gateway和note。gateway中主要实现与合约网关的交互逻辑,note目录中主要实现用于前端展示的组件。最终的项目目录如下图所示。
合约网关交互
由于前端页面展示风格千变万化,我们可以先从与合约网关交互这一个相对靠后的逻辑层次实现起来。 与智能合约网关的交互是用的是http请求,我们直接实用一个http库axios进行通信。我们从实际情况考虑,Dapp是将合约的相关操作和结果展示在前端页面,所以我们完成和合约网关的交互,开发对应的前端页面,就可以完成开发Dapp的需求。
结合最初的用例分析,我们需要在三个事件中与智能合约进行交互。
- 当用户打开应用时,需要展示所有的便签
- 当用户新增便签点击上链后,需要将便签内容保存。相对于我们已经实现的智能合约是InsertNote操作。
- 当用户更新便签点击上链后,需要将便签内容的更新保存下来。在合约中是UpdateNote操作。
1、Client构造
我们将这些交互抽象到一个NotewallGatewayClient中,在gateway中新建一个client.js。 新建一个NoteWallGatewayClient类
import Axios from 'axios';
export default class NoteWallGatewayClient {
    /**
     * @param gatewayAddress {string} 合约网关地址
     * @param address {string} 合约部署地址
     * @param senderAddress {string} 发起交易的账户地址
     * @param senderPrivateKey {string} 发起交易的账户私钥
     */
    constructor(gatewayAddress, address, senderAddress, senderPrivateKey) {
        this.baseUrl = gatewayAddress+"/v2/ethereum/tx/";
        this.address = address;
        this.senderPrivateKey = senderPrivateKey;
        this.sender = senderAddress;
        this.notes = {};
        // 合约网关采用basic auth认证,对合约网关的http请求设置一个拦截器,配置相应的header内容。
其中account和password是我们之前获取的用户名和密码。
        Axios.interceptors.request.use((config) => {
            config.headers={
                "Authorization":'Basic '+btoa('admin:9581564b-93d9-d5bd-ea97-d639d83ca32c'),
                "Content-Type":'application/json',
            }
            return config;
            },(error) =>{
                return Promise.reject(error);
        });
    }
}
通过合约网关,分为交易类和非交易类型,这两种类型请求的参数有所不同,我们将这两种类型的请求封装一下方便后续调用。
// 交易类型请求
transaction(invoke, method){
	let url = this.baseUrl+this.address+"/"+method
    return Axios.post(url,{
        from:this.sender,
        privateKey:this.senderPrivateKey,
        invokeParameters:invoke
    })
}
// 非交易类型请求
call(invoke, method){
	let url = this.baseUrl+this.address+"/"+method
    return Axios.post(url,{
        from:this.sender,
        invokeParameters:invoke
    })
}
创建交易类请求后会得到交易Hash,合约网关提供了根据交易Hash查询上链结果查询接口,我们对该接口进行封装。
replyTx(id){
	let url = this.baseUrl+id
    return Axios.get(url)
}
2、交易类方法调用
这里我们先实现创建note和更新note两个交易类的方法。
/**
 * @param title {string} 便签标题
 * @param content {string} 便签正文
 * @param callback {function} 回调函数
 */
insertNote(title, content, callback) {
    let insert={
        "_title": title,
        "_content": content
    }
    this.transaction(insert, "InsertNote").then(resp => {
      let timerId=setInterval(()=>{
        this.replyTx(resp.data.result.txId).then(resp =>{
            if (Object.keys(resp.data.result).length !== 0) {
                clearInterval(timerId);
                callback(null, resp.data.result)
            }
        })
      },3000);
    });
}

/**
 * @param id {int} 便签id
 * @param title {string} 便签标题
 * @param content {string} 便签正文
 * @param callback {function} 回调函数
 */
updateNote(id, title, content, callback) {
    let update={
        "_id": id,
        "_title": title,
        "_content": content
    }
    this.transaction(update, "UpdateNote").then(resp => {
      console.log(resp);
      let timerId=setInterval(()=>{
        this.replyTx(resp.data.result.txId).then(resp =>{
            if (Object.keys(resp.data.result).length !== 0) {
                clearInterval(timerId);
                callback(null,resp.data.result);
            }
        })
      },3000);
    });
}
可以看到,我们进行创建和更新note的代码很简单,只需要将请求的合约函数相关参数组装为object对象,然后向合约网关发起post请求接受交易Id结果即可;此外,为了方便的检测交易结果是否上链,我们设置了一个定时器,每隔3s检查下交易的状态。
3、非交易类方法调用
非交易类方法主要为view类型的合约方法,我们可以使用合约网关提供的接口直接调用相关的合约方法,会得到合约返回结果。
在具体用例中,我们需要粘连合约中GetNoteIds和GetNote方法。从而满足页面渲染时直接展示所有合约的需求。
这里我们定义一个getAllNotes方法:
/**
 * callback的参数为notes
 * notes格式为map[noteId] {
 *     id {string}
 *     title {string}
 *     content {string}
 * }
 */
getAllNotes(callback){
    let getNoteIds = {
    }
    this.call(getNoteIds, "GetNoteIds").then(async resp => {
      let noteIds = resp.data.result._noteIds;
      for (const noteId of noteIds) {
        let id = {
            "id": noteId
        }
        this.call(id, "GetNote").then(resp => {
          let results=resp.data.result;
          let note={id:noteId};
          note["title"]=results.Result0;
          note["content"]=results.Result1;
          this.notes[noteId] = note;
        });
      }
      return this.notes;
  }).then(notes => {
        callback(notes);
  });
}
到此,与合约交互部分的逻辑都已经开发完成了。NoteWallWeb3Client向外暴露三个方法分别是getAllNotes、insertNote、updateNote。
页面开发
开发页面前,我们首先将页面交互元素做一个拆分。主要的交互模块有:
- 登录表单,登录表单需要用户填写合约地址、发起交易的账户信息等。用户只有提交了登录表单才能查看合约。
- 便签,每一个便签样式类似,但内容不同,一个便签对应合约存储中的一个便签实例。
- 便签板,上面挂载所有的便签元素,并控制其他模块是否渲染。
- 编辑器,编辑器用来给用户创建和更新便签时写入内容用。应该允许用户输入标题、内容。
1、导入样式依赖
本项目会依赖到bootstrap样式表,所以在public/index.html中我们插入bootstrap.css
integrity="sha384-PDle/QlgIONtM1aqA2Qemk5gPOE7wFq8+Em+G/hmo5Iq0CCmYZLv3fVRDJ4MMwEA" crossorigin="anonymous">
2、登录表单
登录表单对应到web3Client的参数,需要用户输入以太坊JSONRPC地址、合约地址、交易账号、交易秘钥四个参数。如图:
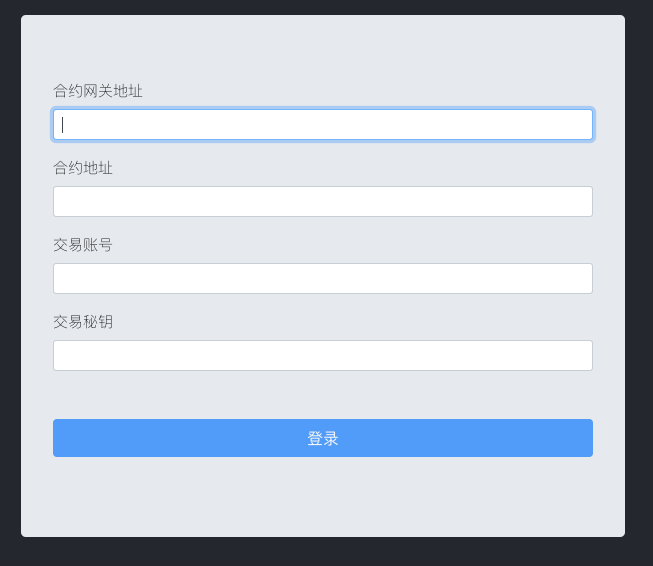
我们直接使用react-bootstrap类库构建表单,当用户点击登录时,会将变量反传到父组件。
/** * @file login form component * @author BaaS Team */ import React, {Component} from 'react'; import { Button, Form, Jumbotron } from 'react-bootstrap'; import './LoginForm.css'; export default class LoginForm extends Component { constructor(props) { super(props); this.state = { gatewayAddress: '', contractAddress: '', senderAddress: '', senderPrivateKey: '' }; } // 这里我们只做最简单的字符串长度校验,有兴趣的读者可以引用web3库的addressFormatter做更标准的地址检查 validateForm() { return this.state.gatewayAddress.length > 0 && this.state.contractAddress.length > 0 && this.state.senderAddress.length > 0 && this.state.senderPrivateKey.length > 0; } // 输入元素内容有变更时即赋值 handleChange = event => { this.setState({ [event.target.id]: event.target.value }); } // 这里会调用父组件传入的saveContractInfo方法,通知上层表单提交 handleSubmit = event => { this.props.saveContractInfo(this.state.gatewayAddress, this.state.contractAddress, this.state.senderAddress, this.state.senderPrivateKey); } render() { return (); } }合约网关地址 合约地址 交易账号 交易秘钥 登录 登录表单样式LoginForm.css如下。
@media all and (min-width: 480px) { .LoginForm { padding: 60px 0; } .LoginForm form { max-width: 540px; width: 540px; margin: 0 auto; font-size: 15px; text-align: left; color: #111; } }便签
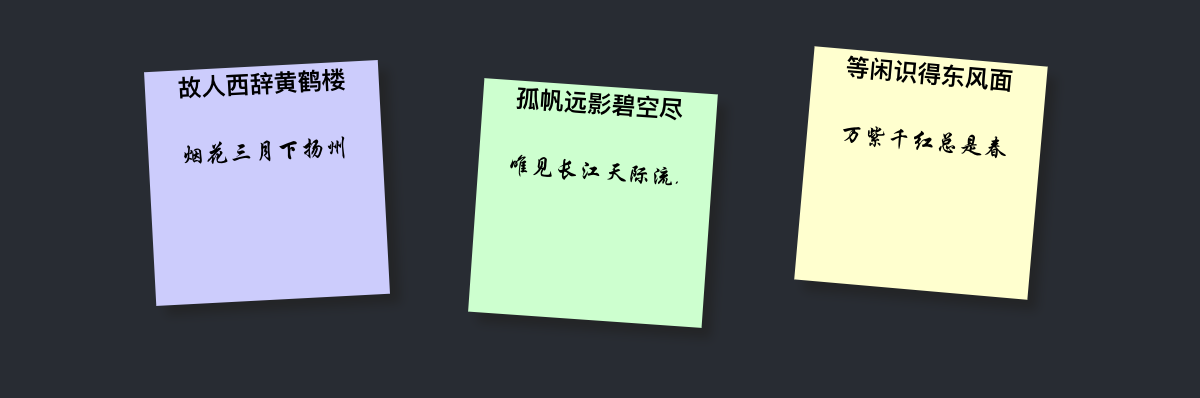
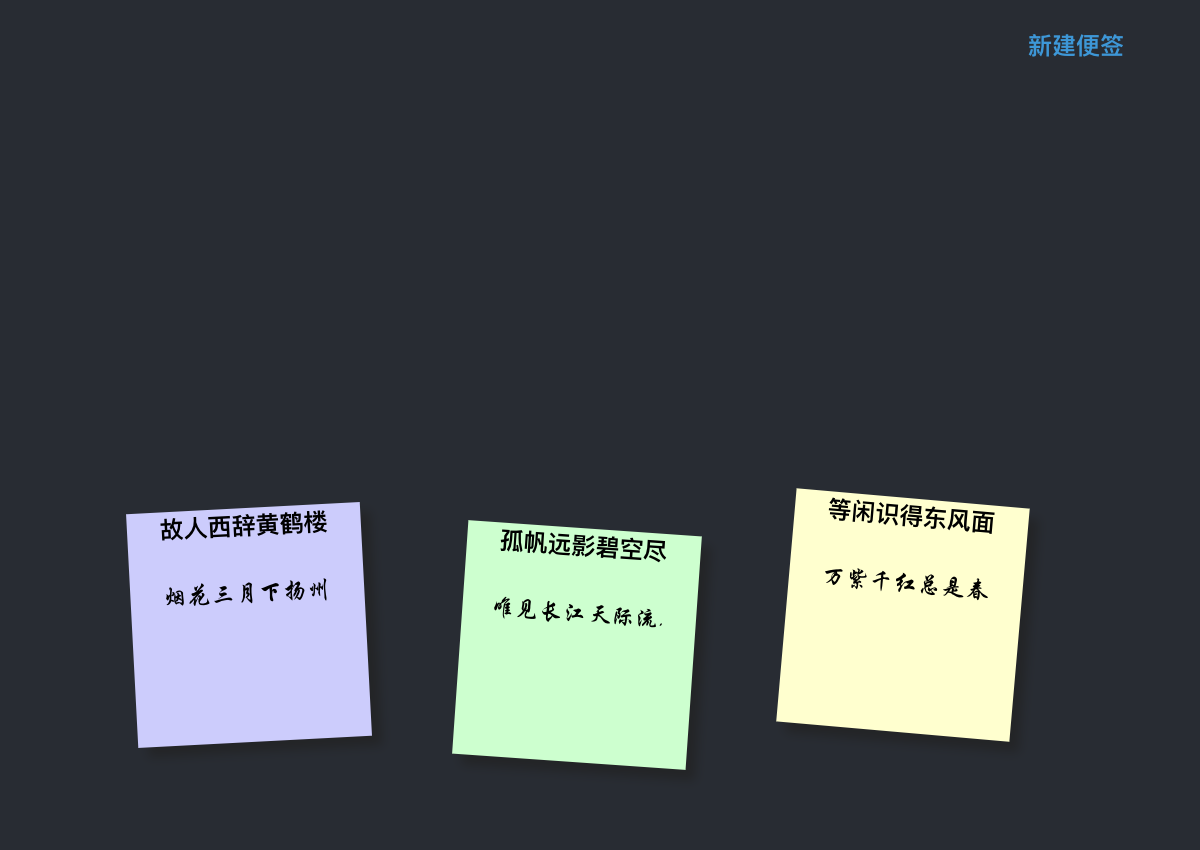
便签模块主要是在样式控制上,这里我们将便签设计成不同颜色区分,会有不同倾斜角的正方形卡片。标题文字加粗。如效果图:
Note元素组件定义:
/** * @file note component * @author BaaS Team */ import React, {Component} from 'react'; import './Note.css'; /** * @props * id {int} * title {string} * content {string} * onClick {function} 被点击时需要调用,上层组件做响应 */ export default class Note extends Component { render() { const {id, title, content} = this.props; return (this.props.onClick(id, title, content)}>); } }{this.props.title}
{this.props.content.substring(0, 20)}
样式控制代码:
body { margin: 1em; } .note-wall, .note { list-style: none; } .note-wall { overflow: hidden; padding: 3em; } .note-panel { display: block; width: 5em; height: 5em; padding: 2px; text-decoration: none; color: #000; background: #ffc; -webkit-box-shadow: 5px 5px 7px rgba(33, 33, 33, .7); -moz-box-shadow: 5px 5px 7px rgba(33, 33, 33, 1); box-shadow: 5px 5px 7px rgba(33, 33, 33, .7); -webkit-transition: -webkit-transform .15s linear; -moz-transition: -moz-transform .15s linear; -o-transition: -o-transform .15s linear; } .note { float: left; margin: 1em; } .note-panel h2 { padding-bottom: 10px; font-size: 20%; font-weight: 700; } .note-panel p { font-family: "STXingkai", "Reenie Beanie", "Microsoft Yahei", arial, sans-serif; font-size: 20%; } .note-panel { -webkit-transform: rotate(-6deg); -moz-transform: rotate(-6deg); -o-transform: rotate(-6deg); } .note-wall div:nth-child(even) .note-panel { position: relative; top: 5px; background: #cfc; -webkit-transform: rotate(4deg); -moz-transform: rotate(4deg); -o-transform: rotate(4deg); } .note-wall div:nth-child(3n) .note-panel { position: relative; top: -5px; background: #ccf; -webkit-transform: rotate(-3deg); -moz-transform: rotate(-3deg); -o-transform: rotate(-3deg); } .note-wall div:nth-child(5n) .note-panel { position: relative; top: -10px; -webkit-transform: rotate(5deg); -moz-transform: rotate(5deg); -o-transform: rotate(5deg); } .note-panel:focus { position: relative; z-index: 5; -webkit-box-shadow: 10px 10px 7px rgba(0, 0, 0, .7); -moz-box-shadow: 10px 10px 7px rgba(0, 0, 0, .7); box-shadow: 10px 10px 7px rgba(0, 0, 0, .7); -webkit-transform: scale(1.25); -moz-transform: scale(1.25); -o-transform: scale(1.25); }1、便签板
便签板组件负责挂载其余组件,并负责通过子组件的事件回调完成子组件的通信。主要有以下核心控制逻辑: 1.当用户未登录时,不显示便签板,只显示登录表单。登录表单提交后,初始化gatewayClient,为后续渲染便签做准备。便签板NoteWall.js代码如下。
/** * @file notewall class. main component in app. * @author BaaS Team */ import React, {Component} from 'react'; import LoginForm from './LoginForm.js'; import NoteWallGatewayClient from '../gateway/client'; export default class NoteWall extends Component { constructor(props) { super(props); this.state = { login: false }; this.saveContractInfo = this.saveContractInfo.bind(this); this.gatewayClient = null; // 控制是否登录 this.login = false; } // 定义了LoginForm回调方法,初始化gatewayClient // gatewayClient将被用于获取便签和创建、更新便签 saveContractInfo(gatewayAddress, contractAddress, senderAddress, senderPrivateKey) { this.gatewayClient = new NoteWallGatewayClient(gatewayAddress, contractAddress, senderAddress, senderPrivateKey); this.setState({login: true}); } render() { if (!this.state.login) { return (); } } }2.当用户登录后,增加渲染便签。全量便签数据通过gatewayClient周期性获取。
/** * @file notewall class. main component in app. * @author BaaS Team */ import React, {Component} from 'react'; import LoginForm from './LoginForm.js'; import Note from './Note.js'; import NoteWallGatewayClient from '../gateway/client.js'; export default class NoteWall extends Component { constructor(props) { super(props); this.state = { editorShow: false, login: false, noteList: [] }; this.periodicGetList = this.periodicGetList.bind(this); this.saveContractInfo = this.saveContractInfo.bind(this); this.gatewayClient = null; this.login = false; } saveContractInfo(gatewayAddress, contractAddress, senderAddress, senderPrivateKey) { this.gatewayClient = new NoteWallGatewayClient(gatewayAddress, contractAddress, senderAddress, senderPrivateKey); this.setState({login: true}); } // Fetch the list on first mount componentWillMount() { this.getListFromGateway(); this.periodicGetList(); } // 每三秒获取一次全量note列表 periodicGetList() { setTimeout(function () { this.getListFromGateway(); this.periodicGetList(); } .bind(this), 3000 ); } // 获取全量note列表 getListFromGateway() { // 未登录时由于没有client,跳过查询 if (!this.state.login) { return; } this.gatewayClient.getAllNotes(notes => { this.setState({ noteList: notes }); }); } render() { let list = this.state.noteList; // 如果已登录,则渲染便签 if (this.state.login) { return ({ Object.keys(list).map(noteId => { let note = list[noteId]; return (); }) }); } return (); } }3.增加editor便签编辑器的控制。
便签编辑器在新建便签和更新便签时需要显示。当更新便签时需要知道便签的ID、标题和正文,所以需要当做参数传入。另外只有当用户需要创建和更新时才需要显示编辑器,所以编辑器需要能够响应这些事件,控制是否显示。同时,编辑器负责便签的存入,需要调用合约接口,需要用到gatewayClient。另外,编辑器存入便签后的相关receipt或者错误数据应该能够通知给用户,所以需要传入回调用的通知函数。
目前为止,因为编辑器还没有实现,我们先假定编辑器组件名字为Editor。这样NoteWall.js文件将更新成。
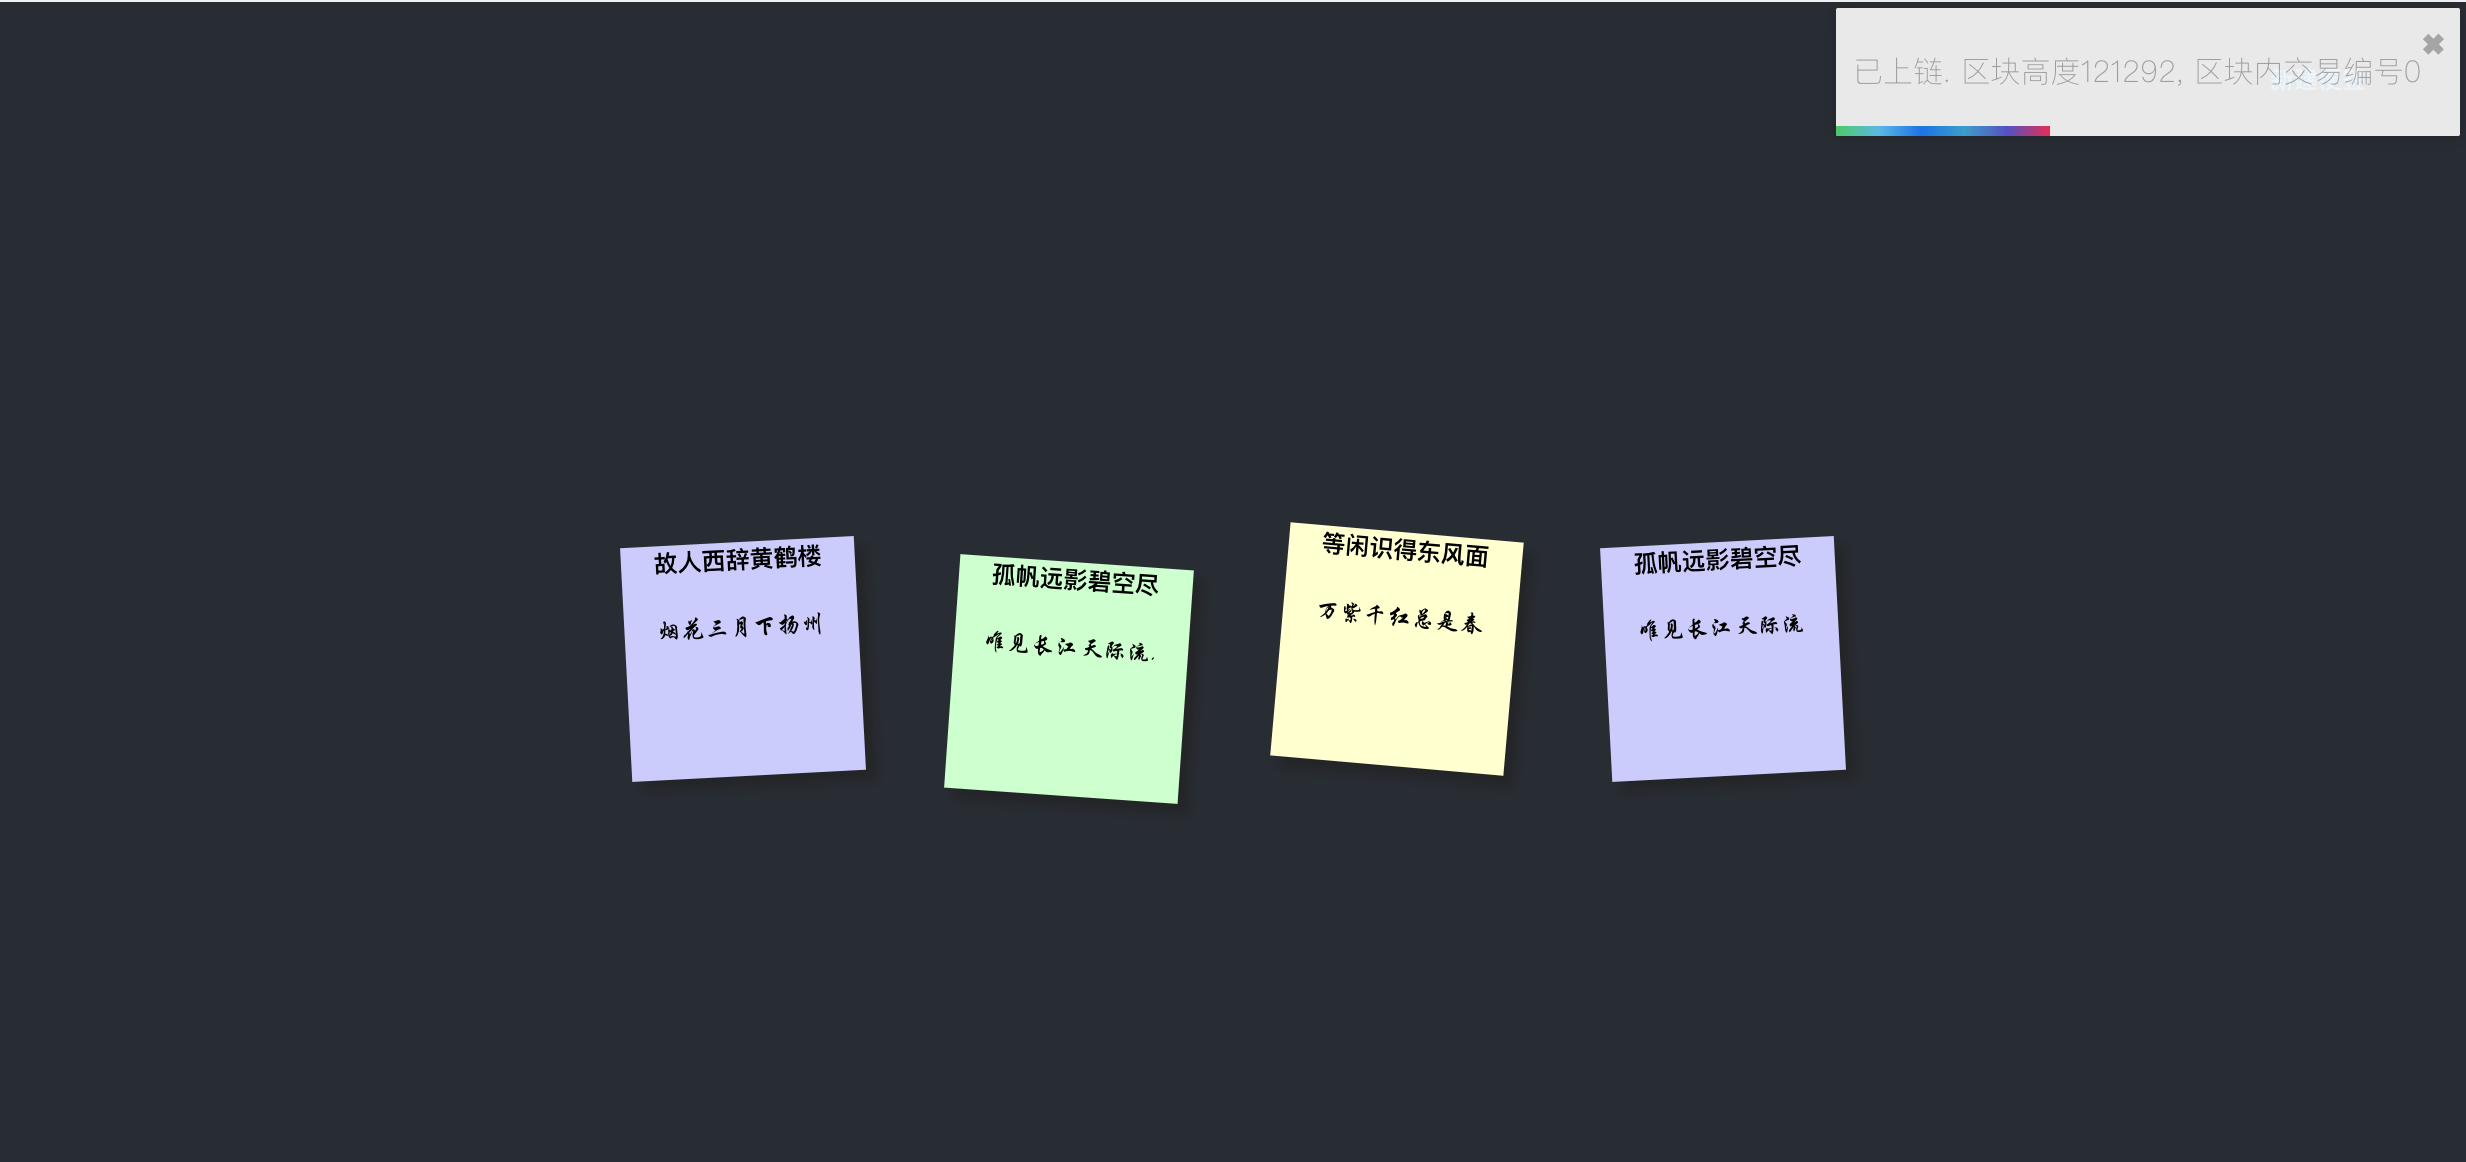
/** * @file notewall class. main component in app. * @author BaaS Team */ import React, {Component} from 'react'; import LoginForm from './LoginForm.js'; import Note from './Note.js'; import Editor from './Editor.js'; import NoteWallGatewayClient from '../gateway/client.js'; export default class NoteWall extends Component { constructor(props) { super(props); this.state = { editorShow: false, login: false, noteList: [] }; this.showEditor = this.showEditor.bind(this); this.closeEditor = this.closeEditor.bind(this); this.periodicGetList = this.periodicGetList.bind(this); this.saveContractInfo = this.saveContractInfo.bind(this); this.notify = this.notify.bind(this); this.errNotify = this.notify.bind(this); this.gatewayClient = null; this.login = false; } // 开关编辑器用 showEditor(id, title, content) { this.setState({ editorShow: !this.state.editorShow, id: id, title: title, content: content }); } // 关闭编辑器用,关闭编辑器后将立即获取便签一次 closeEditor() { this.setState({ editorShow: false }, () => { this.getListFromGateway(); }); } componentWillMount() { this.getListFromGateway(); this.periodicGetList(); } periodicGetList() { setTimeout(function () { this.getListFromGateway(); this.periodicGetList(); } .bind(this), 3000 ); } getListFromGateway() { if (!this.state.login) { return; } this.gatewayClient.getAllNotes(notes => { this.setState({ noteList: notes }); }); } saveContractInfo(gatewayAddress, contractAddress, senderAddress, senderPrivateKey) { this.gatewayClient = new NoteWallGatewayClient(gatewayAddress, contractAddress, senderAddress, senderPrivateKey); this.setState({login: true}); } // 通知函数,调用toast库,通知用户入链信息 notify(msg) { toast(msg); } // 异常通知函数,调用toast.error方法,通知用户入链异常信息 errNotify(msg) { toast.error(msg, { autoClose: 18000 }); } render() { let list = this.state.noteList; if (this.state.login) { return ({ Object.keys(list).map(noteId => { let note = list[noteId]; return (); }) } {/* 参数作用将在Editor组件时看到 */}); } return (); } }4.最后我们在便签板上还需要增加一个“新增便签”的按钮,用户点击后弹出编辑器。所以完整的便签板代码如下:
/** * @file notewall class. main component in app. * @author BaaS Team */ import React, {Component} from 'react'; import LoginForm from './LoginForm.js'; import Note from './Note.js'; import Editor from './Editor.js'; import NoteWallGatewayClient from '../gateway/client.js'; import {ToastContainer, toast} from 'react-toastify'; import 'react-toastify/dist/ReactToastify.css'; export default class NoteWall extends Component { constructor(props) { super(props); this.state = { editorShow: false, login: false, noteList: [] }; this.showEditor = this.showEditor.bind(this); this.closeEditor = this.closeEditor.bind(this); this.periodicGetList = this.periodicGetList.bind(this); this.createNote = this.createNote.bind(this); this.saveContractInfo = this.saveContractInfo.bind(this); this.notify = this.notify.bind(this); this.errNotify = this.notify.bind(this); this.gatewayClient = null; this.login = false; } createNote() { if (!this.state.editorShow) { this.showEditor(null, '', ''); } } showEditor(id, title, content) { this.setState({ editorShow: !this.state.editorShow, id: id, title: title, content: content }); } closeEditor() { this.setState({ editorShow: false }, () => { this.getListFromGateway(); }); } componentWillMount() { this.getListFromGateway(); this.periodicGetList(); } periodicGetList() { setTimeout(function () { this.getListFromGateway(); this.periodicGetList(); } .bind(this), 3000 ); } getListFromGateway() { if (!this.state.login) { return; } this.gatewayClient.getAllNotes(notes => { this.setState({ noteList: notes }); }); } saveContractInfo(gatewayAddress, contractAddress, senderAddress, senderPrivateKey) { this.gatewayClient = new NoteWallGatewayClient(gatewayAddress, contractAddress, senderAddress, senderPrivateKey); this.setState({login: true}); } notify(msg) { toast(msg); } errNotify(msg) { toast.error(msg, { autoClose: 18000 }); } render() { let list = this.state.noteList; if (this.state.login) { return (新建便签{ Object.keys(list).map(noteId => { let note = list[noteId]; return (); }) }); } return (); } }便签板完成后,效果图如下:
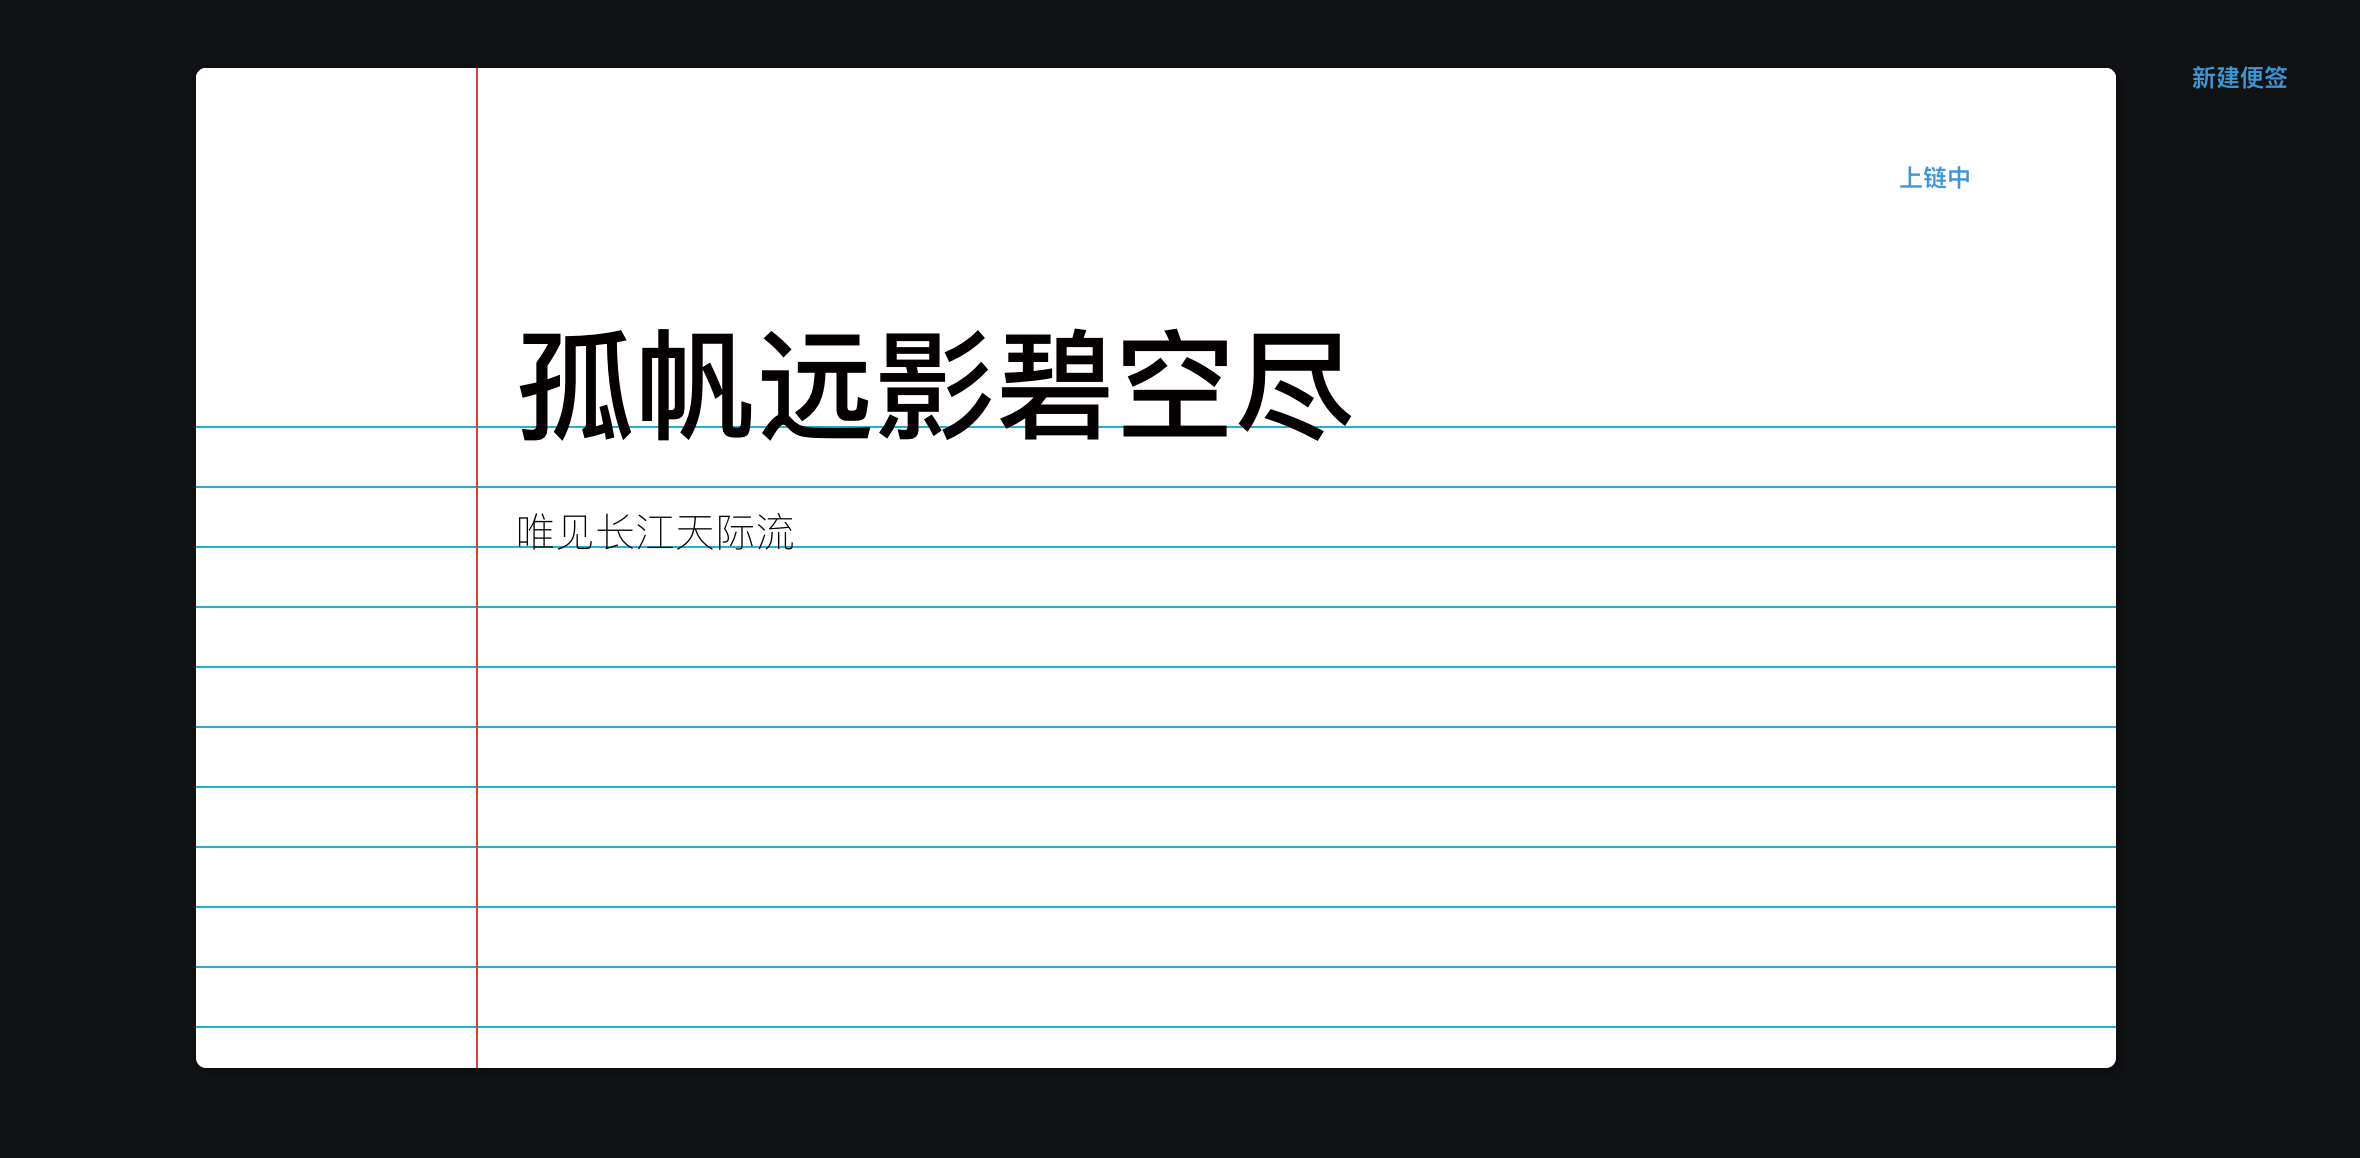
2、编辑器
编辑器本身需要完成四个功能:
1.如果是已有便签更新,那么需要显示便签标题、便签正文; 2.右上角需要有一个“上链”的按钮,用户更新完成后可以点击这个按钮完成便签存入; 3.当便签上链交易完成后,编辑器退出; 4.当用户放弃编辑时,点击编辑器外即可退出编辑。
编辑Editor.js,代码如下:
/** * @file editor component * @author BaaS Team */ import React, {Component} from 'react'; import './Editor.scss'; const titleRef = React.createRef(); const contentRef = React.createRef(); export default class Editor extends Component { constructor(props) { super(props); this.buttonClicked = this.buttonClicked.bind(this); this.saveNoteWithGateway = this.saveNoteWithGateway.bind(this); this.clickMargin = this.clickMargin.bind(this); // 上链中,编辑器不应退出,直到上链结束 this.marginLock = false; this.state = { btnMessage: '上链' }; this.gatewayClient = this.props.gatewayClient; } componentDidMount() { titleRef.current.focus(); } buttonClicked() { if (this.marginLock) { return; } // 修改按钮显示 this.setState({ btnMessage: '上链中' }); this.marginLock = true; this.saveNoteWithGateway(); } saveNoteWithGateway() { if (this.props.id != null) { this.gatewayClient.updateNote(this.props.id, titleRef.current.innerText, contentRef.current.innerText, (err, receipt) => { if (!err) { this.props.notify(`已上链. \n 区块高度${receipt.blockNumber}`); this.props.closeEditor(); } else { this.props.errNotify(`区块链交易遇到问题: ${err}`); } this.setState({ btnMessage: '上链' }); this.marginLock = false; }); } // 新增便签 else { this.gatewayClient.insertNote(titleRef.current.innerText, contentRef.current.innerText, (err, receipt) => { if (!err) { this.props.notify(`已上链. \n 区块高度${receipt.blockNumber}`); this.props.closeEditor(); } else { this.props.errNotify(`区块链交易遇到问题: ${err}`); } this.setState({ btnMessage: '上链' }); this.marginLock = false; }); } } // 如果点击编辑器外部,编辑器退出 clickMargin() { if (!this.marginLock) { this.props.onClick(this.props.title, this.props.content); } } render() { return (this.clickMargin()}>); } }{ e.stopPropagation(); } }>{this.props.title}
{this.state.btnMessage}{this.props.content}Editor的样式如下。
.editor { position: fixed; top: 0; left: 0; width:100%; height: 100%; background: rgba(0, 0, 0, 0.6); } .editor-main { position:fixed; background: white; width: 80%; height: auto; top:50%; left:50%; transform: translate(-50%,-50%); } .display-block { display: block; } .display-none { display: none; } * { -webkit-box-sizing:border-box; -moz-box-sizing:border-box; -ms-box-sizing:border-box; -o-box-sizing:border-box; box-sizing:border-box; } body { background: #f1f1f1; font-family:helvetica neue, helvetica, arial, sans-serif; font-weight:200; } #title-text, #content-text { &:focus { outline: 0; } } #notebook-paper { text-align: left; color: #050000; width:960px; height:500px; background: linear-gradient(to bottom,white 29px,#00b0d7 1px); margin:50px auto; background-size: 100% 30px; position:relative; padding-top:150px; padding-left:160px; padding-right:20px; overflow:auto; border-radius:5px; -webkit-box-shadow:3px 3px 3px rgba(0,0,0,.2),0px 0px 6px rgba(0,0,0,.2); -moz-box-shadow:3px 3px 3px rgba(0,0,0,.2),0px 0px 6px rgba(0,0,0,.2); -ms-box-shadow:3px 3px 3px rgba(0,0,0,.2),0px 0px 6px rgba(0,0,0,.2); -o-box-shadow:3px 3px 3px rgba(0,0,0,.2),0px 0px 6px rgba(0,0,0,.2); box-shadow:3px 3px 3px rgba(0,0,0,.2),0px 0px 6px rgba(0,0,0,.2); &:before { content:''; display:block; position:absolute; z-index:1; top:0; left:140px; height:100%; width:1px; background:#db4034; } header { height:150px; width:100%; background:white; position:absolute; top:0; left:0; h1 { font-size:60px; line-height:60px; padding:127px 20px 0 160px; } } #content { margin-top:67px; font-size:20px; line-height:30px; } #hipsum { margin:0 0 30px 0; } } //Colours $green: #2ecc71; $red: #e74c3c; $blue: #3498db; $yellow: #f1c40f; $purple: #8e44ad; $turquoise: #1abc9c; // Basic Button Style .editor-btn { box-sizing: border-box; appearance: none; background-color: transparent; border: 2px solid $red; border-radius: 0.6em; color: $red; cursor: pointer; display: block; align-self: center; font-size: 3px; font-weight: 500; line-height: 1; margin: 20px; padding: 5px 2px; text-decoration: none; text-align: center; text-transform: uppercase; font-family: 'Montserrat', sans-serif; font-weight: 700; &:hover { color: #fff; outline: 0; } &:focus { outline: 0; } } .header-btn { border-color: $blue; border: 0; border-radius: 0; color: $blue; position: absolute; top: 20px; right: 20px; width: 100px; height: 30px; overflow: hidden; z-index: 1; transition: color 150ms ease-in-out; &:after { content: ''; position: absolute; display: block; top: 0; left: 50%; transform: translateX(-50%); width: 0; height: 100%; background: $blue; z-index: -1; transition: width 150ms ease-in-out; } &:hover { color: #fff; &:after { width: 110%; } } }实现完成后效果如下 编辑便签
上链完成,编辑器退出,弹出通知条
到此Dapp应用层开发完毕,我们可以在本地手动测试一下创建便签、更新便签、退出编辑等功能。接下来我们准备将Dapp进行部署。