


{this.props.content}
百度智能云超级链BaaS Fabric-Dapp开发指南 - Dapp应用层开发
文档简介:
Dapp应用层要做什么:
Dapp应用层最主要的是实现用户侧的交互逻辑,包括web页面和页面事件响应。同时不同的操作会带来不同的事件,我们还需要针对页面事件去调用后端链码方法,存入便签、更新便签、读取便签等。
【百度智能云】可信计算平台
Dapp应用层要做什么
Dapp应用层最主要的是实现用户侧的交互逻辑,包括web页面和页面事件响应。同时不同的操作会带来不同的事件,我们还需要针对页面事件去调用后端链码方法,存入便签、更新便签、读取便签等。
由于是基于React框架做的实现,我们首先要准备一套Dapp应用层的开发环境。
Dapp应用层开发环境准备
- 首先需要安装nodejs环境,本文采用的是v10.16.0版本,npm版本为v6.9.0。我们可以使用nvm安装,也可以通过系统自带的包管理安装。具体的下载安装方法这里不再赘述,可参考官方文档:Node.js下载安装指导
- 准备好nodejs和npm环境后,我们可以一键创建一个React项目。根据不同的环境,我们有两种命令。
$ npx create-react-app notewall-dapp
or
$ create-react-app notewall-dapp
- 执行完之后,我们可以进入notewall-dapp目录,目录里是一个标准的未装任何依赖的项目目录。
- 试着启动一下
$ npm start
npm会启动这个react项目,并且将http server监听在本地3000端口。浏览器访问http://localhost:3000可以查看结果。
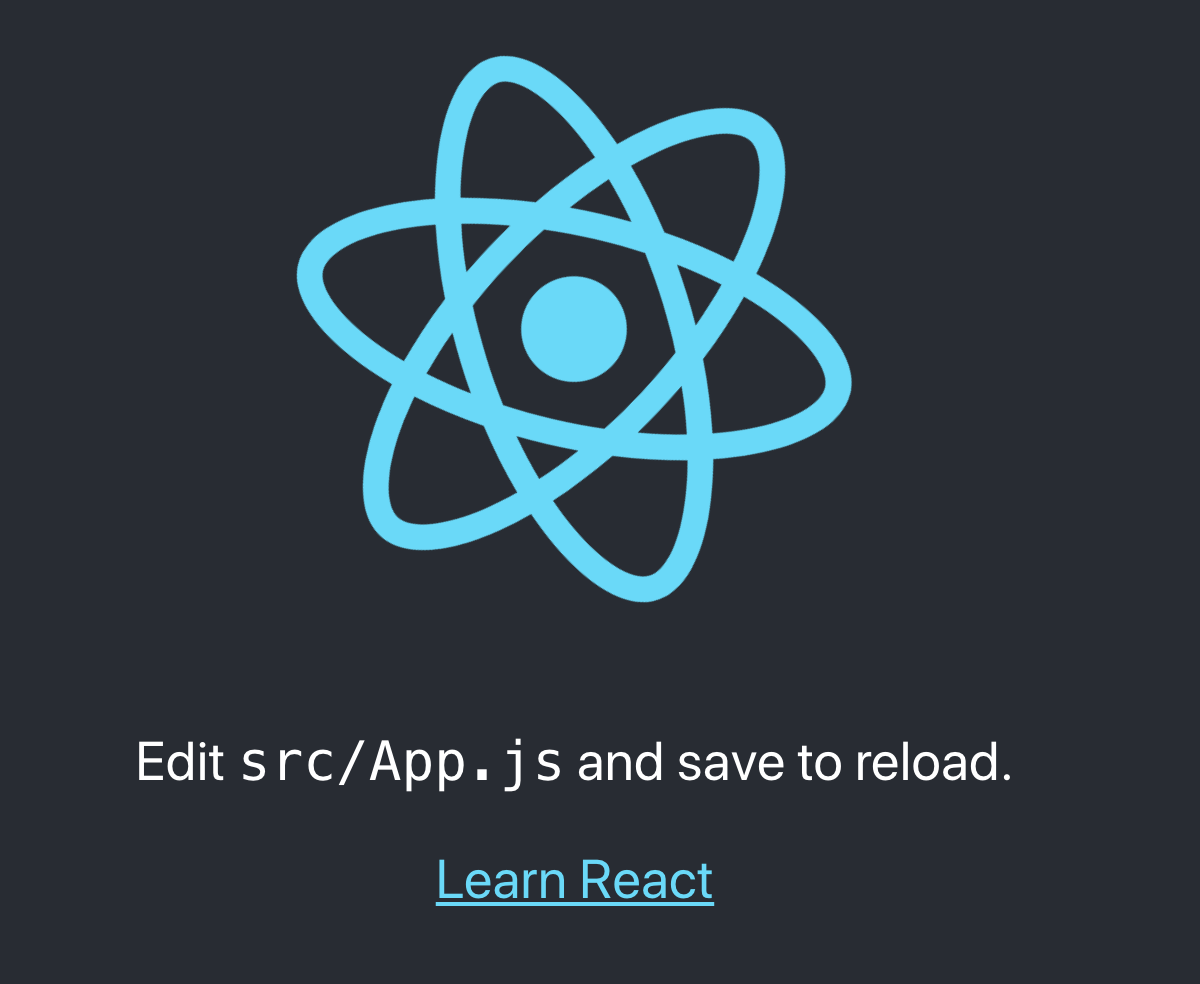
如果我们看到了如下页面显示,则代表项目环境初始化完成,我们可以开始编写应用代码了。
Dapp应用层开发
如上所述,Dapp应用层主要分为两大部分,一个是页面展示与交互逻辑,另一个是与链码的交互。页面展示与交互逻辑由前端和后端部分完成,与链码的交互由后端部分完成。与以太坊不需要后端服务器不同,Fabric与链码交互时,需要msp、证书等信息,需要由后端保存,所以Fabric Dapp多了后端服务器的实现。
我们可以规划项目目录,新建两个子目录分别为client和server。server中主要实现与合约的交互逻辑,client目录中主要实现用于前端展示的组件,为了保持实现语言上的一致性,前后端统一用nodejs实现。
合约交互
由于前端页面展示风格千变万化,我们可以先从后端逻辑实现起来。与链码的交互,我们使用Fabric官方提供的Node SDK。 结合最初的用例分析,我们需要在三个事件中与链码进行交互。
- 当用户打开应用时,需要展示所有的便签
- 当用户新增便签点击上链后,需要将便签内容保存。相对于我们已经实现的链码是InsertNote操作。
- 当用户更新便签点击上链后,需要将便签内容的更新保存下来。在合约中是UpdateNote操作。
准备网络配置
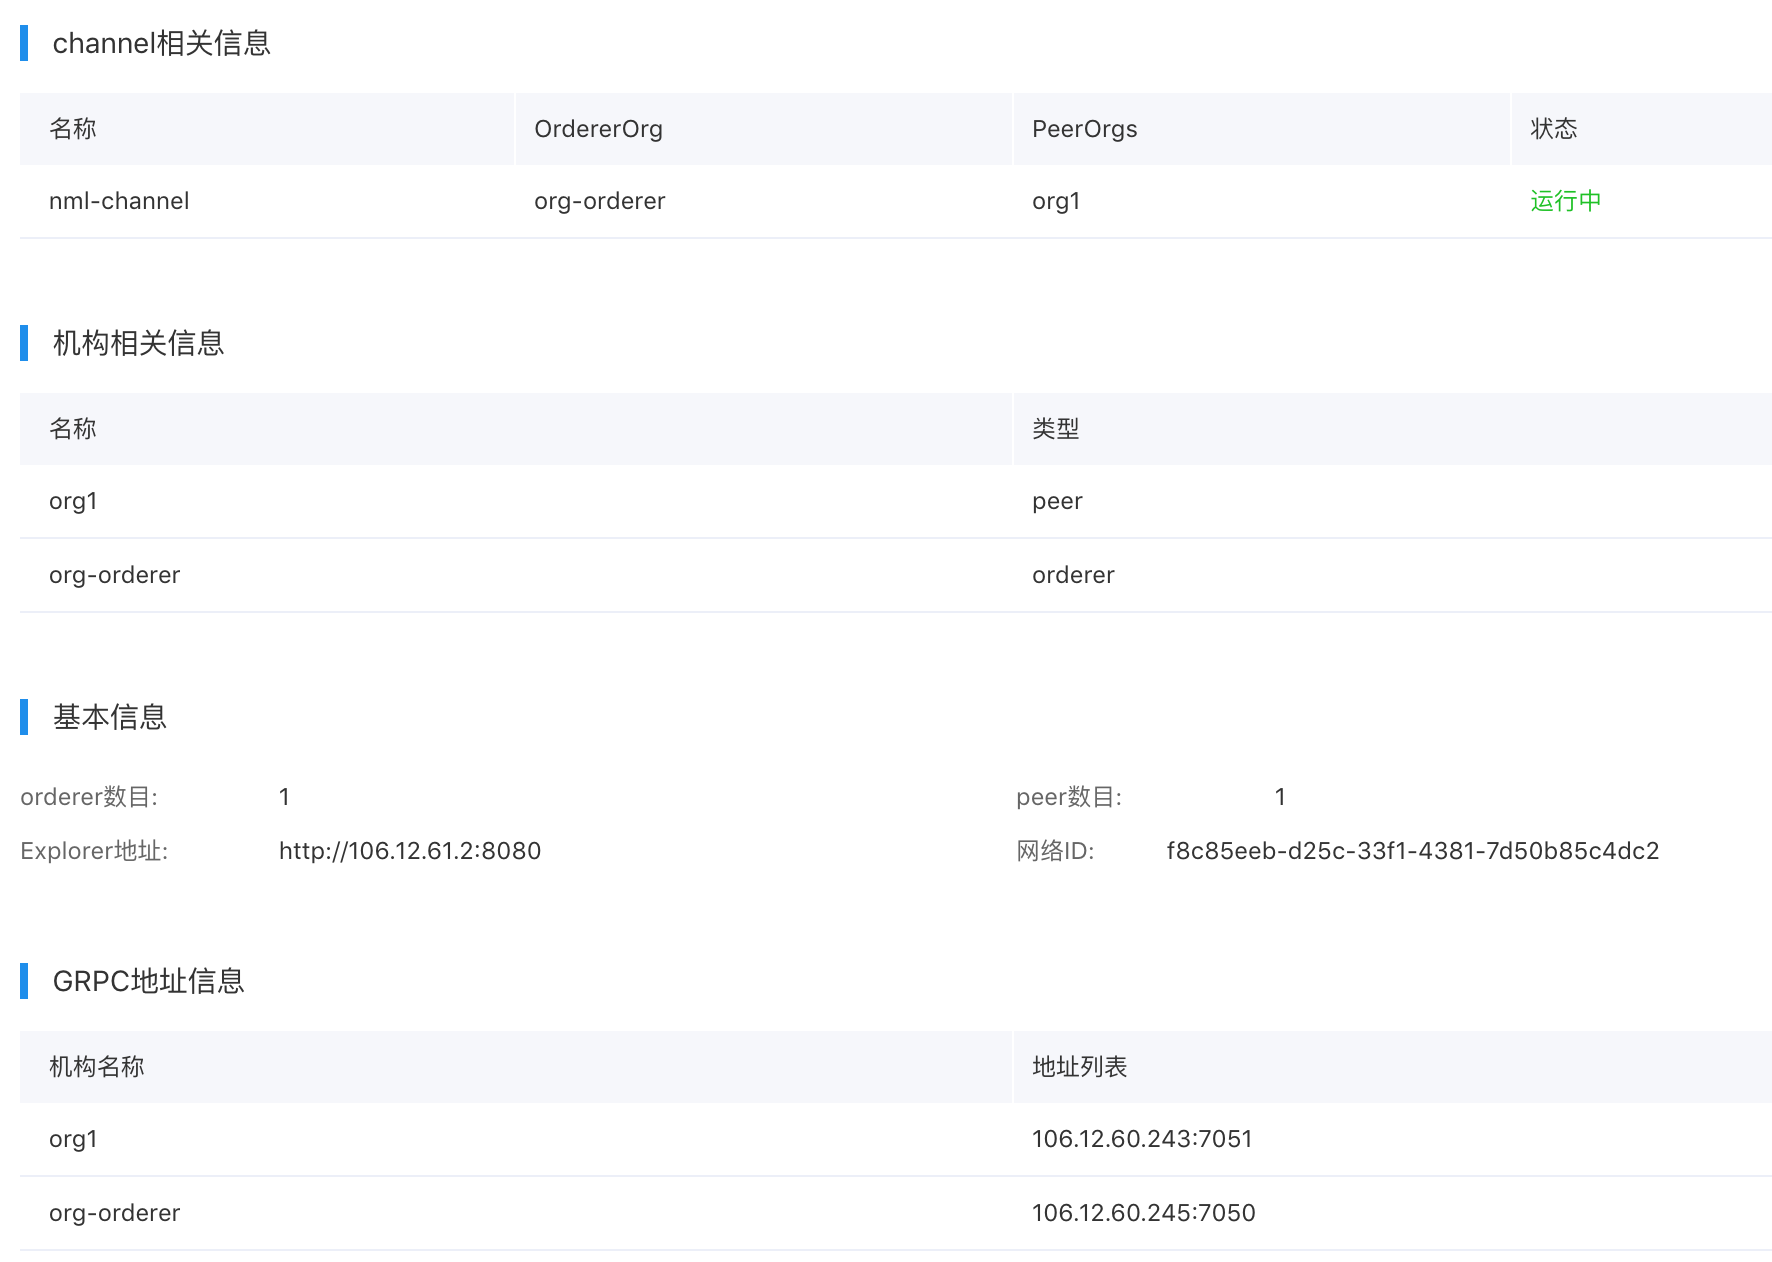
为了实现在外网环境下与Dapp的交互我们在超级链BaaS平台中创建联盟链类型的fabric网络,在网络详情页面可以看到网络的详细配置,在页面右上角可以下载生成的网络证书文件。

fabric网络信息如下:
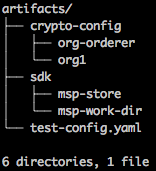
因为生成Fabric Client需要根据网络信息进行配置,需要提前准备好并使服务启动时能够读取。我们在项目中创建artifacts目录用于存放这些信息,Client配置中主要是网络信息及证书。目录如下:
网络配置test_config.yaml详细内容如下:
name: "config"

version: 1.0.0

client:
  organization: org1
  logging:
    level: debug
  credentialStore:
    path: artifacts/sdk/msp-store
    cryptoStore:
      path: artifacts/sdk/msp-work-dir
  BCCSP:
    security:
     enabled: true
     default:
      provider: "SW"
     hashAlgorithm: "SHA2"
     softVerify: true
     level: 256
  tlsCerts:
    systemCertPool: false
    client:
      keyfile:
      certfile:

organizations:
  org-orderer:
    mspid: org-ordererMSP
    certificateAuthorities:
      - ca.org-orderer
    adminPrivateKey:
      path: artifacts/crypto-config/org-orderer/users/Admin@org-orderer/msp/keystore/0210362ecc0
0e5511bd924799dccadc3b015d804c0f0a7633041dfb2471ecc0e_sk
    signedCert:
      path: artifacts/crypto-config/org-orderer/users/Admin@org-orderer/msp/admincerts/Admin@org-orderer-cert.pem
    peers:


  org1:
    mspid: org1MSP
    certificateAuthorities:
      - ca.org1
    adminPrivateKey:
      path: artifacts/crypto-config/org1/users/Admin@org1/msp/keystore/f4be32c6b1332d9b334fc10
805e46f0074dacb1ac4123b23ff1daf9bf2041ef9_sk
    signedCert:
      path: artifacts/crypto-config/org1/users/Admin@org1/msp/admincerts/Admin@org1-cert.pem
    peers:
      - org1-peer0


certificateAuthorities:

  ca.org-orderer:
    url: http://org-orderer-rootca:7053
    httpOptions:
      verify: false
    tlsCACerts:
      path: artifacts/crypto-config/org-orderer/tlsca/tlsca.org-orderer-cert.pem

  ca.org1:
    url: http://org1-rootca:7054
    httpOptions:
      verify: false
    tlsCACerts:
      path: artifacts/crypto-config/org-orderer/tlsca/tlsca.org-orderer-cert.pem


orderers:

  orderer0:
    url: grpcs://106.12.60.245:7050
    grpcOptions:
      ssl-target-name-override: orderer0
      allow-insecure: 0
    tlsCACerts:
      path: artifacts/crypto-config/org-orderer/tlsca/tlsca.org-orderer-cert.pem


peers:

  org1-peer0:
    url: grpcs://106.12.60.243:7051
    grpcOptions:
      ssl-target-name-override: org1-peer0
    tlsCACerts:
      path: artifacts/crypto-config/org1/tlsca/tlsca.org1-cert.pem


channels:
  nml-channel:
    orderers:
      - orderer0

    peers:
      org1-peer0:
        endorsingPeer: true
        chaincodeQuery: true
        ledgerQuery: true
        eventSource: true

    policies:
      queryChannelConfig:
        minResponses: 1
        maxTargets: 1
        retryOpts:
          attempts: 5
          initialBackoff: 500ms
          maxBackoff: 5s
          backoffFactor: 2.0
后端服务启动
服务端文件的目录结构为:
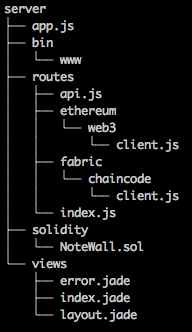
服务启动时会默认展示主页,具体代码如下:
/**
 * @file index js file
 * @author BaaS Team
 */
var express = require('express');
var router = express.Router();

// GET home page
router.get('/', function (req, res, next) {
    res.render('index', {
        title: 'Express'
    });
});

module.exports = router;
除此之外,后端服务启动时会构建NoteWallFabricClient对象,并定义路由,具体代码如下:
/**
 * @file /api handler
 * @author BaaS Team
 */
const express = require('express');
const NoteWallWeb3Client = require('./ethereum/web3/client.js');
const NoteWallFabricClient = require('./fabric/chaincode/client');
const router = express.Router();

let mode = process.env.BLOCKCHAIN_TYPE.toUpperCase();
let blockchainClient;
if (mode === 'ETHEREUM') {
    let httpProvider = process.env.HTTP_PROVIDER;
    if (!httpProvider) {
        console.error('HTTP_PROVIDER not defined');
        process.exit(1);
    }
    let contractAddress = process.env.CONTRACT_ADDRESS;
    if (!contractAddress) {
        console.error('CONTRACT_ADDRESS not defined');
        process.exit(1);
    }
    let senderAddress = process.env.SENDER_ADDRESS;
    if (!senderAddress) {
        console.error('SENDER_ADDRESS not defined');
        process.exit(1);
    }
    let senderPrivateKey = process.env.SENDER_PRIVATE_KEY;
    if (!senderPrivateKey) {
        console.error('SENDER_PRIVATE_KEY not defined');
        process.exit(1);
    }
    blockchainClient = new NoteWallWeb3Client(httpProvider, contractAddress, senderAddress, senderPrivateKey);
}
else if (mode === 'FABRIC') {
    let networkConfigPath = process.env.FABRIC_NETWORK_CONFIG_PATH;
    if (!networkConfigPath) {
        console.error('FABRIC_NETWORK_CONFIG_PATH not defined');
        process.exit(1);
    }
    let channelName = process.env.FABRIC_CHANNEL_NAME;
    if (!channelName) {
        console.error('FABRIC_CHANNEL_NAME not defined');
        process.exit(1);
    }
    let chaincodeName = process.env.FABRIC_CHAINCODE_NAME;
    if (!chaincodeName) {
        console.error('FABRIC_CHAINCODE_NAME not defined');
        process.exit(1);
    }
    blockchainClient = new NoteWallFabricClient(networkConfigPath, channelName, chaincodeName);
}
else {
    console.error('BLOCKCHAIN_TYPE not valid. ETHEREUM or FABRIC');
}

router.route('/note').post((req, res, next) => {
    let id = req.body.id;
    let title = req.body.title;
    let content = req.body.content;
    console.log(`${id} ${title} ${content}`);
    // update
    if (id) {
        blockchainClient.updateNote(id, title, content, (err, receipt) => {
            if (!err) {
                res.json({status: 0, message: 'ok'});
            }
            else {
                res.json({status: 1, message: err});
            }
        });
    }
    // insert
    else {
        blockchainClient.insertNote(title, content, (err, receipt) => {
            if (!err) {
                res.json({status: 0, message: 'ok'});
            }
            else {
                res.json({status: 1, message: err});
            }
        });
    }
});

router.get('/notes', (req, res, next) => {
    blockchainClient.getAllNotes(notes => {
        res.json({status: 0, message: notes});
    });
});

module.exports = router;
Client构造
我们将这些交互抽象到一个NoteWallFabricClient中,在routes目录中创建fabric/chaincode子目录,并在chaincode目录下创建client.js文件。 新建一个NoteWallFabricClient类
class NoteWallFabricClient {
    constructor(networkConfigPath, channelName, chaincodeName) {
        let client = fabricClient.loadFromConfig(networkConfigPath);
        client.initCredentialStores();
        let channel = client.getChannel(channelName);
        this.client = client;
        this.channel = channel;
        this.chaincodeName = chaincodeName;
    }
}

module.exports = NoteWallFabricClient;
构造函数通过Fabric网络配置文件构建了一个Client,实际使用时需要根据用户自身网络信息配置该文件。然后从client对象中获取channel对象,并将chaincode名称保存。
交易类方法调用
这里我们先实现创建note交易的方法。
/**
     * @param title {string} 便签标题
     * @param content {string} 便签正文
     * @param callback {function} 回调函数
     */
    async insertNote(title, content, callback) {
        // note id由当前时间戳生成,用户可以强化此处id生成方法
        let id = + new Date();
        // 用于标识是否发向所有peer的交易提案成功
        let allGood = true;
        let errorMessage = null;

        try {
            let txId = this.client.newTransactionID(true);

            // 构建交易请求
            let request = {
                chaincodeId: this.chaincodeName,
                fcn: 'insert',
                args: [id.toString(), title, content],
                txId: txId
            };

            // 发送交易提案,也即背书
            let results = await this.channel.sendTransactionProposal(request, true);
            let proposalResponses = results[0];
            let proposal = results[1];

            // 处理所有peer的返回
            for (const i in proposalResponses) {
                if (proposalResponses[i] instanceof Error) {
                    allGood = false;
                    errorMessage = util.format('invoke chaincode proposal resulted in an error :: %s',
                        proposalResponses[i].toString());
                    console.log(errorMessage);
                } else if (proposalResponses[i].response && proposalResponses[i].response.status === 200) {
                    console.info('invoke chaincode proposal was good');
                } else {
                    allGood = false;
                    errorMessage = util.format('invoke chaincode proposal failed for an unknown reason %j',
                        proposalResponses[i]);
                    console.log(errorMessage);
                }
            }

            // 如果返回都成功,将交易提交给orderer
            if (allGood) {
                const promises = [];
                let eventHubs = await this.channel.getChannelEventHubsForOrg();
                eventHubs.forEach(eh => {
                    console.log('invokeEventPromise - setting up event:' + eh.getName());
                    let invokeEventPromise = new Promise((resolve, reject) => {
                        let eventTimeout = setTimeout(() => {
                            let message = 'REQUEST_TIMEOUT:' + eh.getPeerAddr();
                            console.log(message);
                            eh.disconnect();
                        }, 3000);
                        eh.registerTxEvent(txId.getTransactionID(), (tx, code, blockNum) => {
                                console.log('The chaincode invoke chaincode transaction has been committed on peer %s',
                                    eh.getPeerAddr());
                                console.log('Transaction %s has status of %s in blocl %s', tx, code, blockNum);
                                clearTimeout(eventTimeout);

                                if (code !== 'VALID') {
                                    let message = util.format('The invoke chaincode transaction was invalid, code:%s',
                                        code);
                                    console.log(message);
                                    reject(new Error(message));
                                } else {
                                    let message = 'The invoke chaincode transaction was valid.';
                                    console.log(message);
                                    resolve(message);
                                }
                            }, err => {
                                clearTimeout(eventTimeout);
                                console.log('err:' + err);
                                reject(err);
                            },
                            // the default for 'unregister' is true for transaction listeners
                            // so no real need to set here, however for 'disconnect'
                            // the default is false as most event hubs are long running
                            // in this use case we are using it only once
                            {unregister: true, disconnect: true}
                        );
                        eh.connect();
                    });
                    promises.push(invokeEventPromise);
                });
                const ordererRequest = {
                    txId: txId,
                    proposalResponses: proposalResponses,
                    proposal: proposal
                };
                const sendPromise = this.channel.sendTransaction(ordererRequest);

                promises.push(sendPromise);
                let results = await Promise.all(promises);
                let response = results.pop();
                if (response.status === 'SUCCESS') {
                    console.log('Successfully sent transaction to the orderer.');
                } else {
                    errorMessage = util.format('Failed to order the transaction. Error code: %s', response.status);
                    console.log(errorMessage);
                }

                // 监控event hubs结果
                for (let i in results) {
                    let eventHubResult = results[i];
                    let eventHub = eventHubs[i];
                    console.log('Event results for event hub :%s', eventHub.getPeerAddr());
                    if (typeof eventHubResult === 'string') {
                        console.log(eventHubResult);
                    } else {
                        if (!errorMessage) {
                            errorMessage = eventHubResult.toString();
                        }
                        console.log(eventHubResult.toString());
                    }
                }

            }
        } catch (error) {
            console.error('Failed to invoke due to error: ' + error.stack ? error.stack : error);
            errorMessage = error.toString();
        }
        return callback(errorMessage, null);
    }
更新note的方法和新建note的方法基本一致,唯一的区别就是将链码函数从insert改为update。
非交易类方法调用
非交易类方法主要为view类型的合约方法,可以直接查询而不用生成区块。具体代码如下:
/**
	 * callback的参数为notes
	 * notes格式为map[noteId] {
	 *     id {int}
	 *     title {string}
	 *     content {string}
	 * }
	 */
    async getAllNotes(callback) {
        let request = {
            chaincodeId: this.chaincodeName,
            fcn: 'queryAll',
            args: ['']
        };
        let queryResponses = await this.channel.queryByChaincode(request, true);
        console.log('Query has completed, checking results:' + (queryResponses));
        return callback(JSON.parse(queryResponses.toString('utf8')));
    }
到此,与合约交互部分的逻辑都已经开发完成了。NoteWallFabricClient向外暴露三个方法分别是getAllNotes、insertNote、updateNote。
页面开发
开发页面前,我们首先将页面交互元素做一个拆分。主要的交互模块有
- 便签,每一个便签样式类似,但内容不同,一个便签对应合约存储中的一个便签实例;
- 便签板,上面挂载所有的便签元素,并控制其他模块是否渲染;
- 编辑器,编辑器用来给用户创建和更新便签时写入内容用。应该允许用户输入标题、内容;
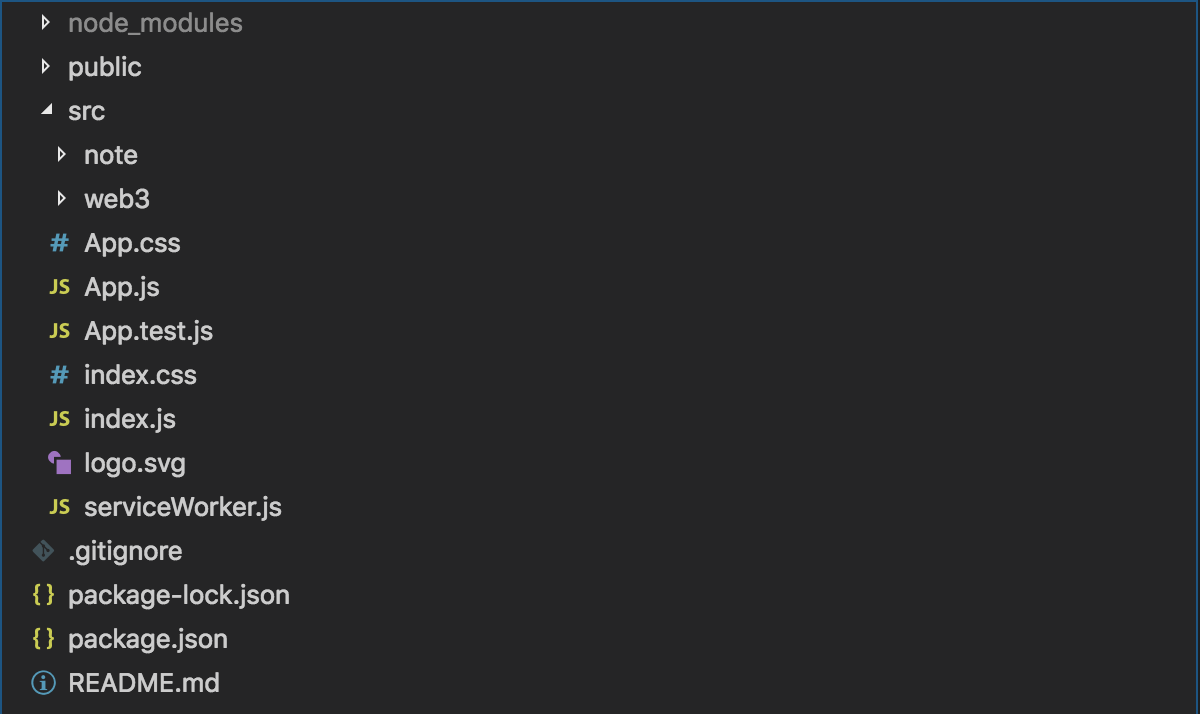
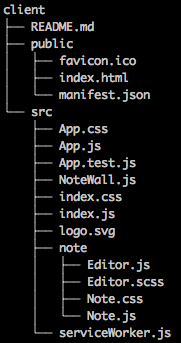
客户端文件目录结构为:
主页
主页比较简单,主要内容是定义了主渲染区”root“,代码如下
React AppYou need to enable JavaScript to run this app.
主页默认渲染便签板,代码如下:
/**
 * @file client index
 * @author BaaS Team
 */
import React from 'react';
import ReactDOM from 'react-dom';
import './index.css';
import App from './App';
import * as serviceWorker from './serviceWorker';

ReactDOM.render(, document.getElementById('root'));

// If you want your app to work offline and load faster, you can change
// unregister() to register() below. Note this comes with some pitfalls.
// Learn more about service workers: http://bit.ly/CRA-PWA
serviceWorker.unregister();
index样式控制表:
body {
    margin: 0;
    padding: 0;
    font-family: -apple-system, BlinkMacSystemFont, "Segoe UI", "Roboto", "Oxygen",
    "Ubuntu", "Cantarell", "Fira Sans", "Droid Sans", "Helvetica Neue",
    sans-serif;

    -webkit-font-smoothing: antialiased;
    -moz-osx-font-smoothing: grayscale;
}

code {
    font-family: source-code-pro, Menlo, Monaco, Consolas, "Courier New",
    monospace;
}
index中渲染了APP对象,渲染代码如下:
/**
 * @file app component
 * @author BCE BaaS Team
 */

import React, {Component} from 'react';
import './App.css';
import NoteWall from './NoteWall';

export default class App extends Component {
    render() {
        return (


);
    }
}
APP样式控制表:
.App {
    text-align: center;
}

.App-logo {
    height: 40vmin;
    animation: App-logo-spin infinite 20s linear;
}

.App-header {
    display: flex;
    flex-direction: column;
    min-height: 100vh;
    font-size: calc(10px + 2vmin);
    color: #fff;
    background-color: #282c34;

    align-items: center;
    justify-content: center;
}

.App-link {
    color: #61dafb;
}

@keyframes App-logo-spin {
    from {
        transform: rotate(0deg);
    }
    to {
        transform: rotate(360deg);
    }
}
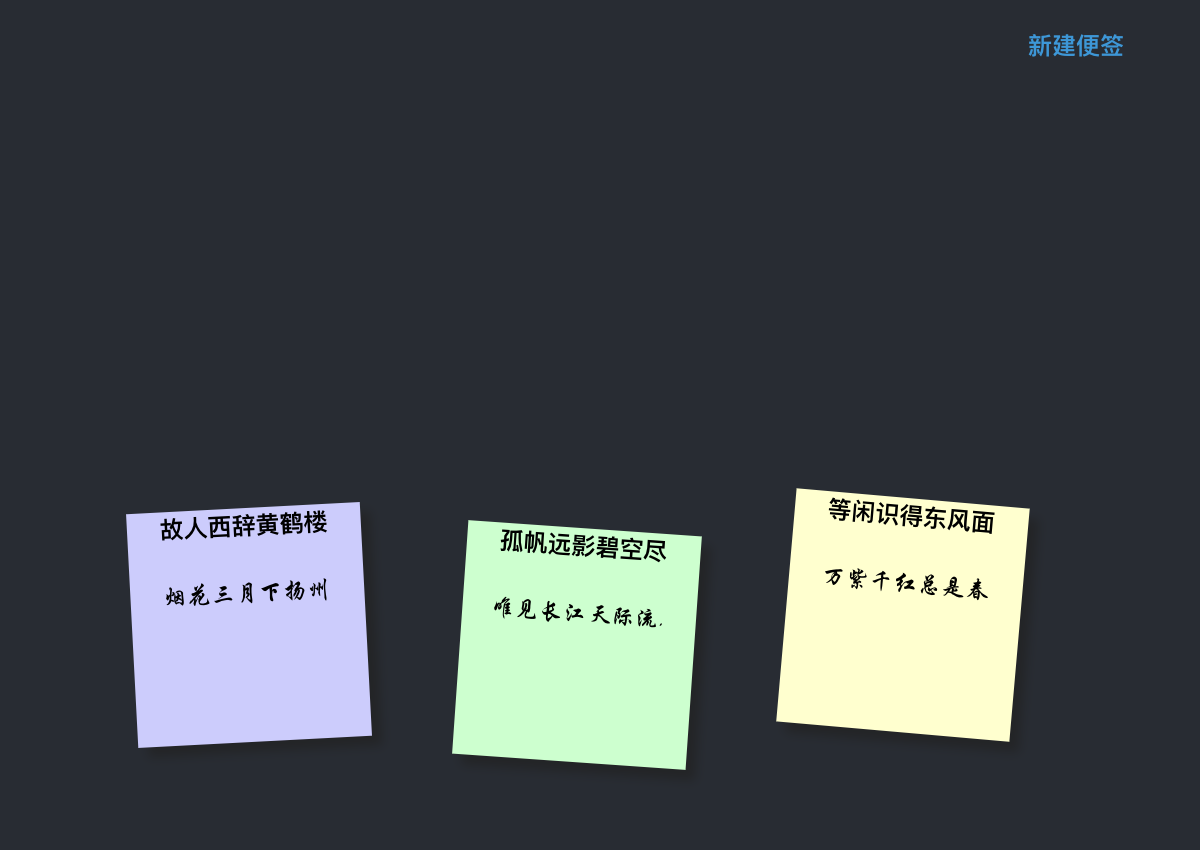
便签
便签模块主要是在样式控制上,这里我们将便签设计成不同颜色区分,会有不同倾斜角的正方形卡片。标题文字加粗。如效果图:

Note元素组件定义
/**
 * @file note component
 * @author BaaS Team
 */
import React, {Component} from 'react';
import './Note.css';

export default class Note extends Component {
    render() {
        const {id, title, content} = this.props;
        return (

                this.props.onClick(id, title, content)}>


																						{this.props.title}


																						{this.props.content}


);
    }
}
样式控制代码:
* {
    margin: 0;
    padding: 0;
}

body {
    margin: 1em;
    font-family: arial, sans-serif;
    font-size: 100%;
    color: #fff;
    background: #666;
}

h2,
p {
    font-size: 100%;
    font-weight: 400;
}

.note-wall,
.note {
    list-style: none;
}

.note-wall {
    overflow: hidden;
    padding: 3em;
}

.note-panel {
    display: block;
    width: 5em;
    height: 5em;
    padding: 2px;
    text-decoration: none;
    color: #000;
    background: #ffc;
    -webkit-box-shadow: 5px 5px 7px rgba(33, 33, 33, .7);
       -moz-box-shadow: 5px 5px 7px rgba(33, 33, 33, 1);
            box-shadow: 5px 5px 7px rgba(33, 33, 33, .7);
    -webkit-transition: -webkit-transform .15s linear;
       -moz-transition:    -moz-transform .15s linear;
         -o-transition:      -o-transform .15s linear;
}

.note {
    float: left;
    margin: 1em;
}

.note-panel h2 {
    padding-bottom: 10px;
    font-size: 20%;
    font-weight: 700;
}

.note-panel p {
    font-family: "Reenie Beanie", arial, sans-serif;
    font-size: 20%;
}

.note-panel {
    -webkit-transform: rotate(-6deg);
       -moz-transform: rotate(-6deg);
         -o-transform: rotate(-6deg);
}

.note-wall div:nth-child(even) .note-panel {
    position: relative;
    top: 5px;
    background: #cfc;
    -webkit-transform: rotate(4deg);
       -moz-transform: rotate(4deg);
         -o-transform: rotate(4deg);
}

.note-wall div:nth-child(3n) .note-panel {
    position: relative;
    top: -5px;
    background: #ccf;
    -webkit-transform: rotate(-3deg);
       -moz-transform: rotate(-3deg);
         -o-transform: rotate(-3deg);
}

.note-wall div:nth-child(5n) .note-panel {
    position: relative;
    top: -10px;
    -webkit-transform: rotate(5deg);
       -moz-transform: rotate(5deg);
         -o-transform: rotate(5deg);
}

.note-panel:focus {
    position: relative;
    z-index: 5;
    -webkit-box-shadow: 10px 10px 7px rgba(0, 0, 0, .7);
       -moz-box-shadow: 10px 10px 7px rgba(0, 0, 0, .7);
            box-shadow: 10px 10px 7px rgba(0, 0, 0, .7);
    -webkit-transform: scale(1.25);
       -moz-transform: scale(1.25);
         -o-transform: scale(1.25);
}
便签板
便签板组件负责挂载其余组件,并负责通过子组件的事件回调完成子组件的通信。主要有以下核心控制逻辑:
/**
* @file notewall class. main component in app.
* @author BaaS Team
*/
import React, {Component} from 'react';
import Note from './note/Note.js';
import Editor from './note/Editor.js';
export default class NoteWall extends Component {
constructor(props) {
super(props);
this.state = {
editorShow: false,
noteList: []
};
this.showEditor = this.showEditor.bind(this);
this.closeEditor = this.closeEditor.bind(this);
this.periodicGetList = this.periodicGetList.bind(this);
}
showEditor(id, title, content) {
this.setState({
editorShow: !this.state.editorShow,
id: id,
title: title,
content: content
});
}
closeEditor() {
this.setState({
editorShow: false
}, () => {
this.getList();
});
}
// Fetch the list on first mount
componentWillMount() {
this.getList();
this.periodicGetList();
}
periodicGetList() {
setTimeout(
function () {
this.getList();
this.periodicGetList();
}
.bind(this),
3000
);
}
// Retrieves the list of items from the Express app
getList() {
fetch('/api/notes')
.then(res => res.json())
.then(res => this.setState({noteList: res.message}));
}
render() {
let list = this.state.noteList;
return (
);
}
}
便签板完成后,效果图如下:
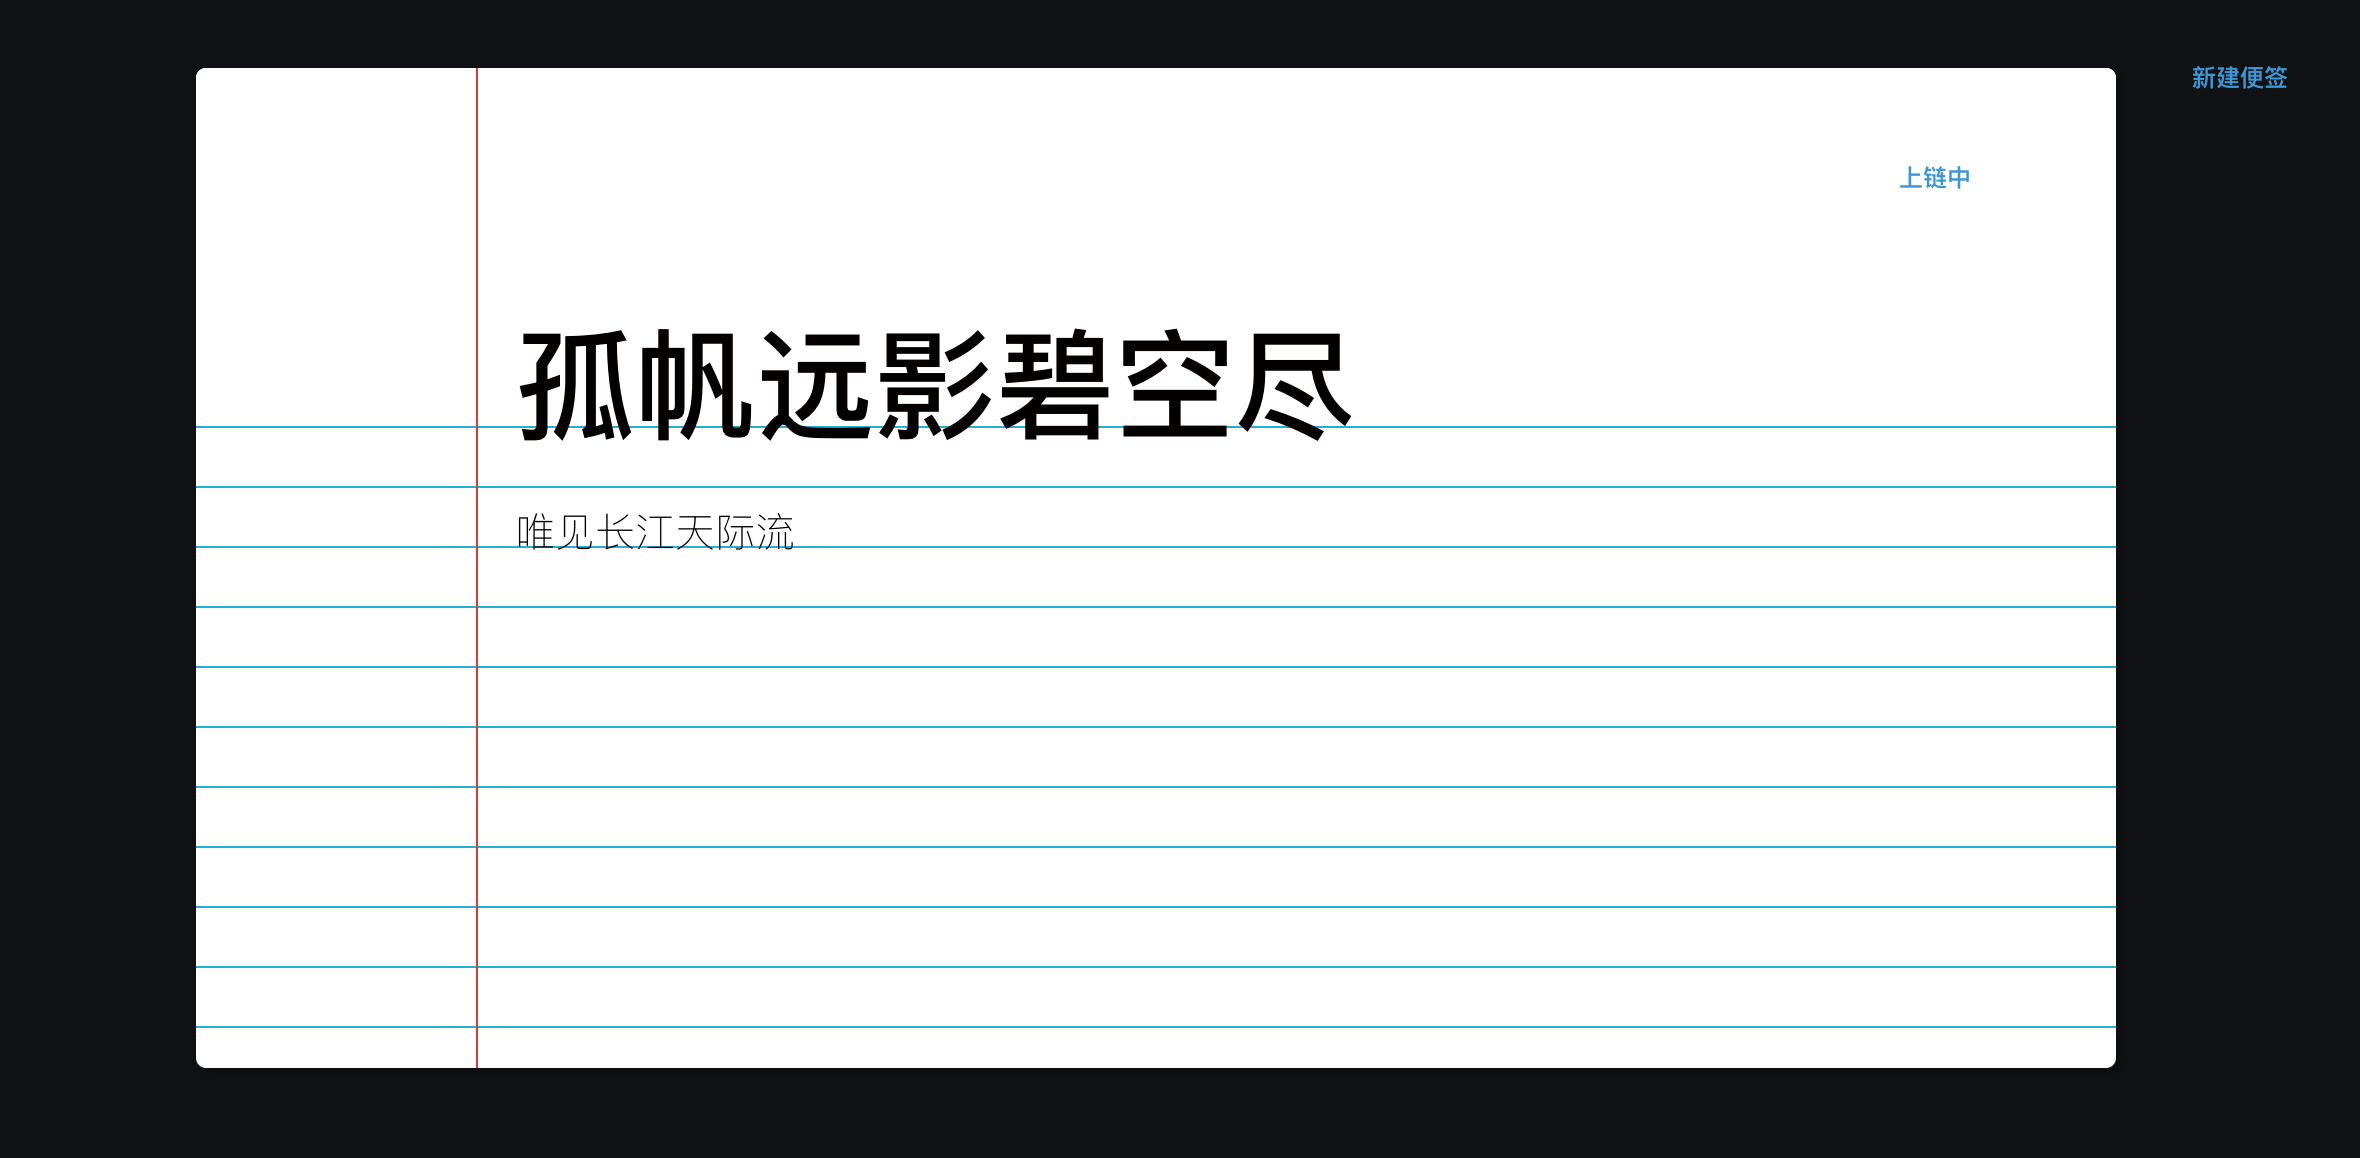
编辑器
编辑器本身需要完成四个功能:
- 如果是已有便签更新,那么需要显示便签标题、便签正文;
- 右上角需要有一个“上链”的按钮,用户更新完成后可以点击这个按钮完成便签存入;
- 当便签上链交易完成后,编辑器退出;
- 当用户放弃编辑时,点击编辑器外即可退出编辑。
编辑Editor.js,代码如下
/**
* @file editor component
* @author BaaS Team
*/
import React, {Component} from 'react';
import './Editor.scss';
const titleRef = React.createRef();
const contentRef = React.createRef();
export default class Editor extends Component {
constructor(props) {
super(props);
this.saveNote = this.saveNote.bind(this);
}
saveNote() {
fetch('/api/note', {
method: 'POST',
headers: {
'Content-Type': 'application/json'
},
body: JSON.stringify({
id: this.props.id,
title: titleRef.current.innerText,
content: contentRef.current.innerText
})
})
.then(res => {
res.json();
})
.then(list => this.setState({
noteList: list
}, () => this.props.closeEditor()));
}
render() {
return (
this.props.onClick(this.props.title, this.props.content)}>
{
e.stopPropagation();
}
}>
{this.props.title}
保存
);
}
}
Editor的样式表:
.editor {
  position: fixed;
  top: 0;
  left: 0;
  width:100%;
  height: 100%;
  background: rgba(0, 0, 0, 0.6);
}

.editor-main {
  position:fixed;
  background: white;
  width: 80%;
  height: auto;
  top:50%;
  left:50%;
  transform: translate(-50%,-50%);
}

.display-block {
  display: block;
}

.display-none {
  display: none;
}

* {
  -webkit-box-sizing:border-box;
  -moz-box-sizing:border-box;
  -ms-box-sizing:border-box;
  -o-box-sizing:border-box;
  box-sizing:border-box;
}

body {
  background: #f1f1f1;
  font-family:helvetica neue, helvetica, arial, sans-serif;
  font-weight:200;
}

#notebook-paper {
  text-align: left;
  color: #050000;
  width:960px;
  height:500px;
  background: linear-gradient(to bottom,white 29px,#00b0d7 1px);
  margin:50px auto;
  background-size: 100% 30px;
  position:relative;
  padding-top:150px;
  padding-left:160px;
  padding-right:20px;
  overflow:hidden;
  border-radius:5px;
  -webkit-box-shadow:3px 3px 3px rgba(0,0,0,.2),0px 0px 6px rgba(0,0,0,.2);
  -moz-box-shadow:3px 3px 3px rgba(0,0,0,.2),0px 0px 6px rgba(0,0,0,.2);
  -ms-box-shadow:3px 3px 3px rgba(0,0,0,.2),0px 0px 6px rgba(0,0,0,.2);
  -o-box-shadow:3px 3px 3px rgba(0,0,0,.2),0px 0px 6px rgba(0,0,0,.2);
  box-shadow:3px 3px 3px rgba(0,0,0,.2),0px 0px 6px rgba(0,0,0,.2);
  &:before {
    content:'';
    display:block;
    position:absolute;
    z-index:1;
    top:0;
    left:140px;
    height:100%;
    width:1px;
    background:#db4034;
  }
  header {
    height:150px;
    width:100%;
    background:white;
    position:absolute;
    top:0;
    left:0;
    h1 {
      font-size:60px;
      line-height:60px;
      padding:127px 20px 0 160px;
    }
  }
  #content {
    margin-top:67px;
    font-size:20px;
    line-height:30px;
  }

  #hipsum {
    margin:0 0 30px 0;
  }
}

//Colours
$green: #2ecc71;
$red: #e74c3c;
$blue: #3498db;
$yellow: #f1c40f;
$purple: #8e44ad;
$turquoise: #1abc9c;

// Basic Button Style
.btn {
  box-sizing: border-box;
  appearance: none;
  background-color: transparent;
  border: 2px solid $red;
  border-radius: 0.6em;
  color: $red;
  cursor: pointer;
  display: block;
  align-self: center;
  font-size: 3px;
  font-weight: 500;
  line-height: 1;
  margin: 20px;
  padding: 5px 2px;
  text-decoration: none;
  text-align: center;
  text-transform: uppercase;
  font-family: 'Montserrat', sans-serif;
  font-weight: 700;

  &:hover,
  &:focus {
    color: #fff;
    outline: 0;
  }
}

.header-btn {
  border-color: $purple;
  // border: 0;
  border-radius: 0;
  color: $purple;
  position: absolute;
  top: 20px;
  right: 20px;
  width: 50px;
  height: 30px;
  overflow: hidden;
  z-index: 1;
  transition: color 150ms ease-in-out;

  &:after {
    content: '';
    position: absolute;
    display: block;
    top: 0;
    left: 50%;
    transform: translateX(-50%);
    width: 0;
    height: 100%;
    background: $purple;
    z-index: -1;
    transition: width 150ms ease-in-out;
  }

  &:hover {
    color: #fff;
    &:after {
      width: 110%;
    }
  }
}
实现完成后效果如下
编辑便签
到此Dapp应用层开发完毕,我们可以在本地手动测试一下创建便签、更新便签、退出编辑等功能。接下来我们准备将Dapp进行部署。