
文档简介:


目录
1.创建并启动Notebook
2.训练物体检测模型
3.配置并发布模型
4.校验模型
5.部署在线服务
基于 Notebook 的物体检测模板使用指南
本文介绍了物体检测模板下,从创建 Notebook 任务到引入数据、训练模型,再到保存模型、部署模型的全流程。
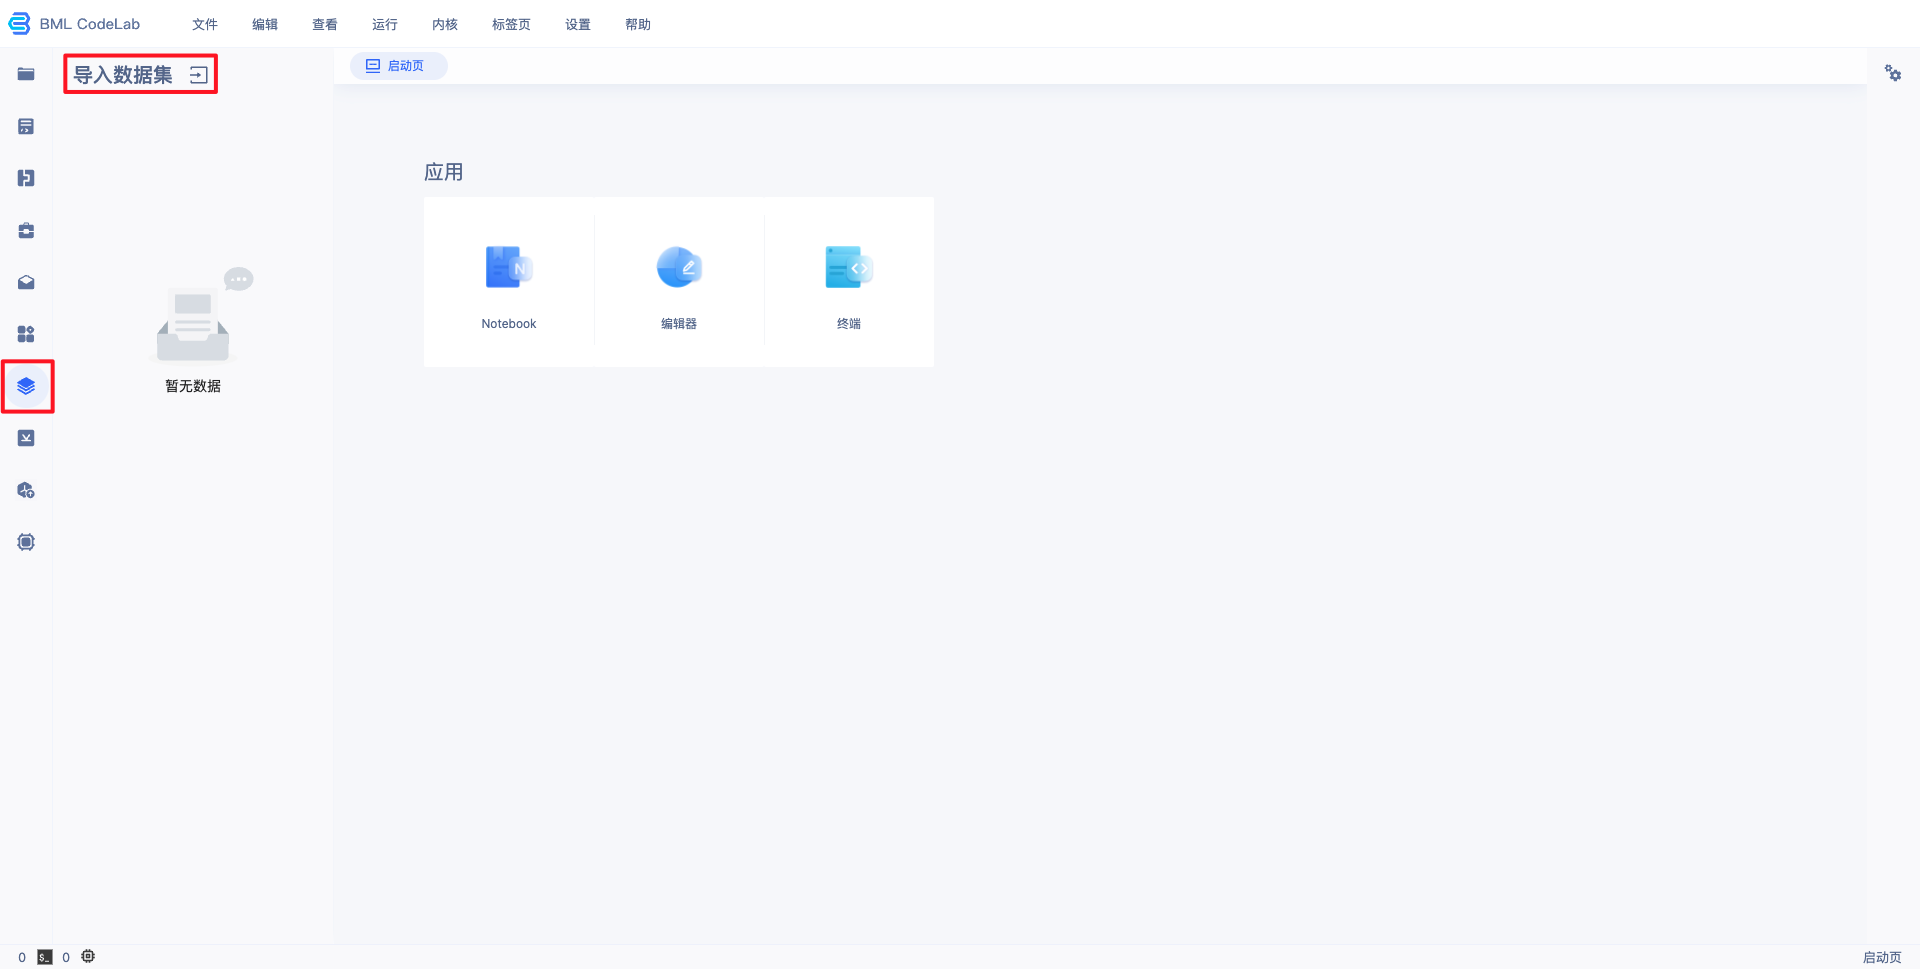
创建并启动Notebook
1、在 BML 左侧导航栏中点击『Notebook』
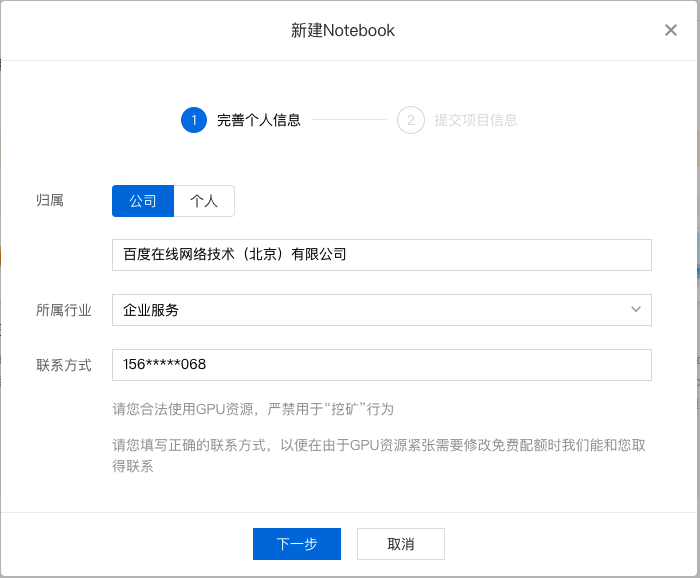
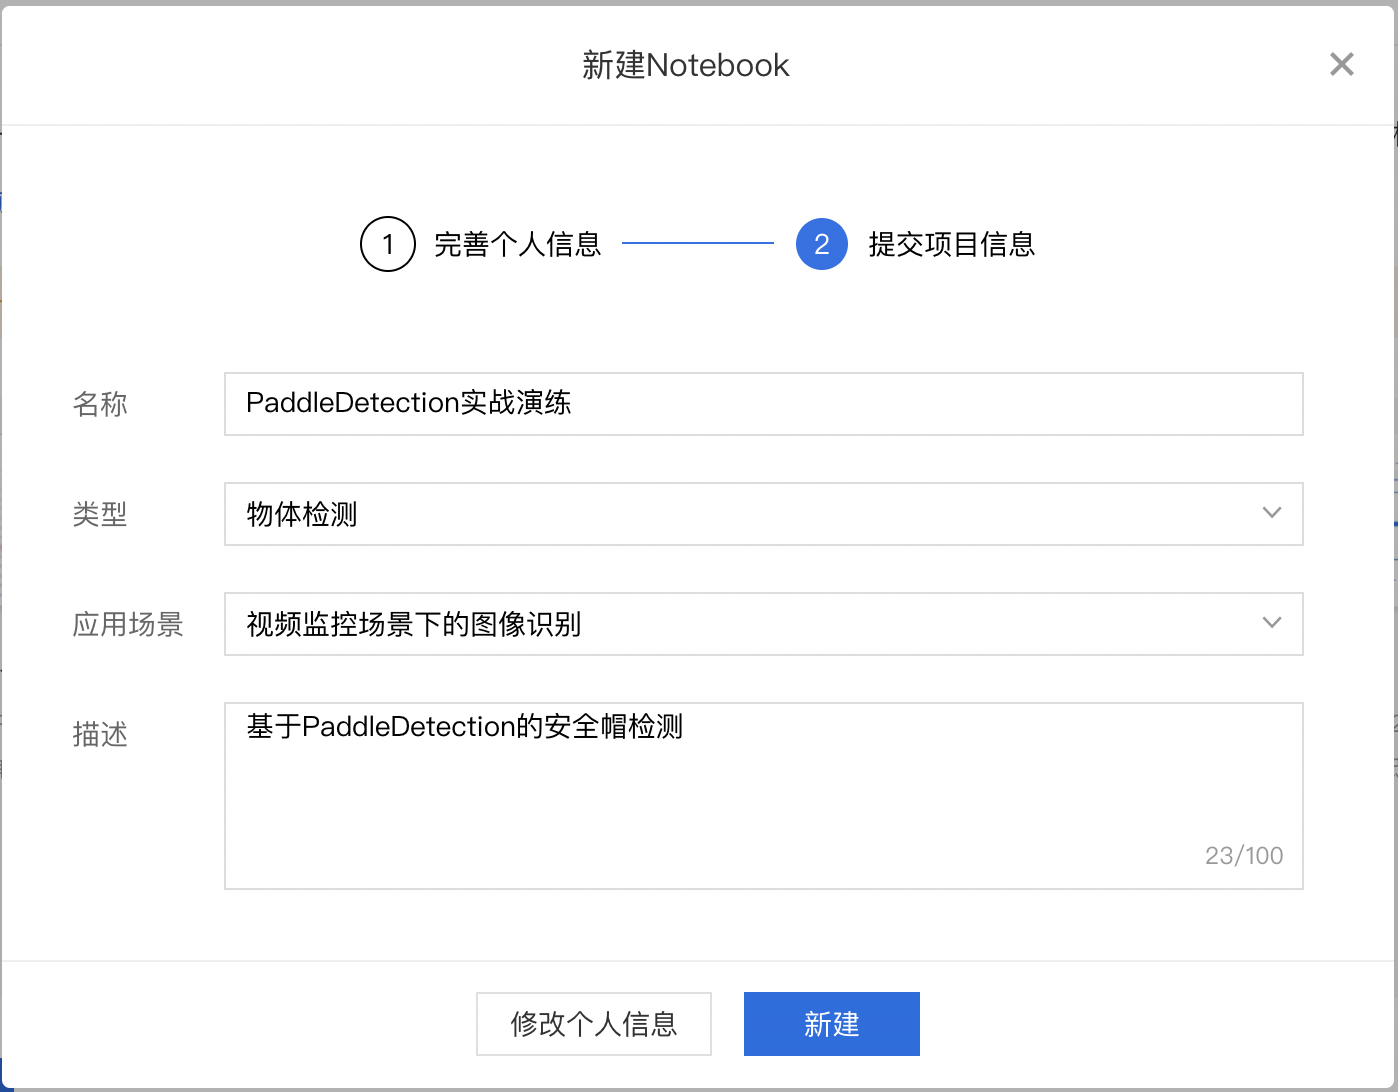
2、在 Notebook 页面点击『新建』,在弹出框中填写公司/个人信息以及项目信息,示例如下:
填写基础信息
填写项目信息
3、对 Notebook 任务操作入口中点击『配置』进行资源配置,示例如下:
选择开发语言、AI 框架,由于本次采用 PaddleDetection 进行演示,所以需要选择 python3.7、PaddlePaddle2.0.0。选择资源规格,由于深度学习所需的训练资源一般较多,需要选择GPU V100的资源规格。
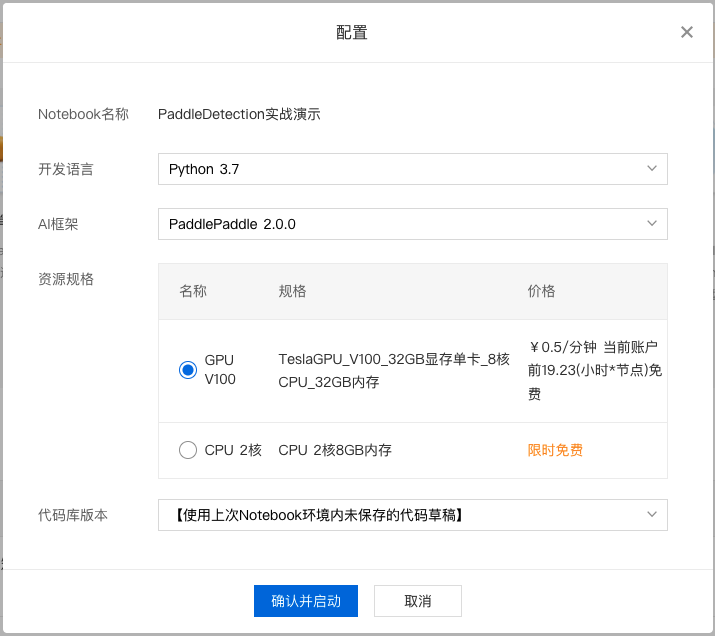
完成配置后点击『确认并启动』,即可启动 Notebook,启动过程中需要完成资源的申请以及实例创建,请耐心等待。
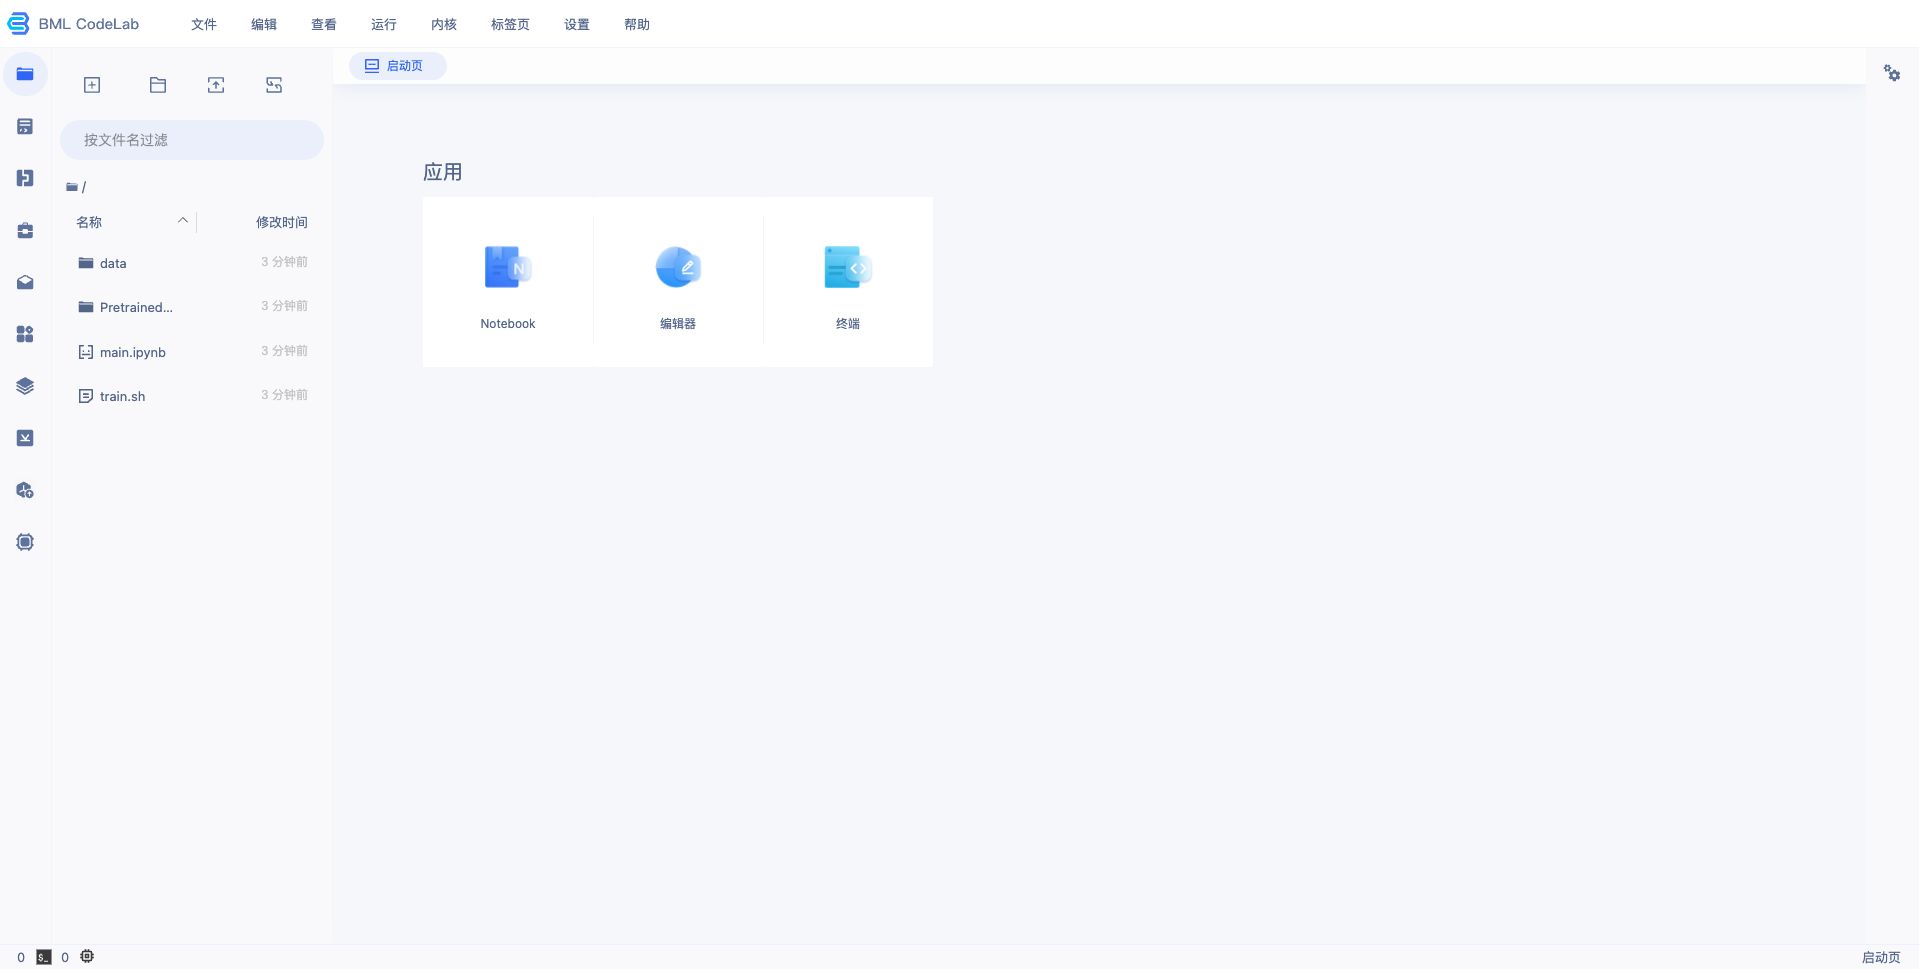
4、等待 Notebook 启动后,点击『打开』,页面跳转到 Notebook,即完成 Notebook 的创建与启动,示例如下:
训练物体检测模型
下载 PaddleDetection 套件
打开进入 Notebook,点击进入终端,输入如下命令切换到 /home/work/ 目录。
cd /home/work/
本文以 PaddleDetection 代码库 release/2.3 分支为例,输入如下命令克隆PaddleDetection代码库并切换至release/2.3分支。整个过程需要数十秒,请耐心等待。
# gitee 国内下载比较快 git clone https://gitee.com/paddlepaddle/PaddleDetection.git -b release
/2.3 # github # git clone https://github.com/PaddlePaddle/PaddleDetection.git -b release/2.3
安装环境
在终端环境中,安装该版本的 PaddleDetection 代码包依赖的 paddlepaddle-gpu,执行如下命令:
python -m pip install paddlepaddle-gpu==2.1.3.post101 -f https://www.paddlepaddle.org.cn/whl/linux/mkl/avx/stable.html
安装完成后,使用 python 或 python3 进入python解释器,输入 import paddle ,再输入 paddle.utils.run_check()
如果出现 PaddlePaddle is installed successfully!,说明成功安装。
准备训练数据
训练数据是模型生产的重要条件,优质的数据集可以很大程度上的提升模型训练效果,准备数据可以参考链接。本文所用的安全帽检测数据集可前往此链接进行下载:下载链接。
1、导入用户数据。
在 Notebook 中并不能直接访问您在 BML 中创建的数据集,需要通过左边选择栏的导入数据集选项,进行数据集导入。导入的数据位于用户目录的 data/ 文件夹(当原始数据集有更新时,不会自动同步,需要手工进行同步)。
注:若在BML中未创建数据集,请先参考 数据服务 ,创建、上传、标注数据集。
2、数据转换。
PaddleDetection 训练所需要的数据格式与 BML 默认的数据格式有所不同,所以需要利用脚本将导入的数据转为 PaddleDetection 支持的数据格式,并进行3:7切分。
PaddleDetection 默认支持的标注格式为 COCO格式,转换脚本如下:
import os import cv2 import json import glob import codecs import random from pycocotools.
coco import COCO def parse_bml_json(json_file): """
    解析BML标注文件
    :return:
    """ annos = json.loads(codecs.open(json_file).read()) labels = annos['labels'] bboxes
= [] for label in labels: x1 = label["x1"] y1 = label["y1"] x2 = label["x2"] y2 = label["y2"] id =
 label["name"] bboxes.append([x1, y1, x2, y2, id]) return bboxes def bbox_transform(box): """
    x1, y1, x2, y2 转为 x1, y1, width, height
    :return
    """ box = list(map(lambda x: float(x), box)) box[2] = box[2] - box[0] box[3] = box[3] -
box[1] return box def parse_label_list(src_data_dir, save_dir): """
    遍历标注文件,获取label_list
    :return:
    """ label_list = [] anno_files = glob.glob(src_data_dir + "*.json") for anno_f in anno
_files: annos = json.loads(codecs.open(anno_f).read()) for lb in annos["labels"]: label_list
.append(lb["name"]) label_list = list(set(label_list)) with codecs.open(os.path.join(save_dir,
"label_list.txt"), 'w', encoding="utf-8") as f: for id, label in enumerate(label_list):
f.writelines("%s:%s\n" % (id, label)) return len(label_list), label_list def bml2coco
(src_dir, coco_json_file): """
    BML标注格式转为COCO标注格式
    :return:
    """ coco_images = [] coco_annotations = [] image_id = 0 anno_id = 0 image_list = glob.glob(src_dir
+ "*.[jJPpBb][PpNnMm]*") for image_file in image_list: anno_f = image_file.split(".")[0] + ".json"
if not os.path.isfile(anno_f): continue bboxes = parse_bml_json(anno_f) im = cv2.imread(image_file)
 h, w, _ = im.shape
        image_i = {"file_name": os.path.basename(image_file), "id": image_id, "width": w, "height":
h} coco_images.append(image_i) for id, bbox in enumerate(bboxes): # bbox : [x1, y1, x2, y2,
label_name] anno_i = {"image_id": image_id, "bbox": bbox_transform(bbox[:4]), 'category_id':
label_list.index(bbox[4]), 'id': anno_id, 'area': 1.1, 'iscrowd': 0, "segmentation": None}
anno_id += 1 coco_annotations.append(anno_i) image_id += 1 coco_categories = [{"id": id,
"name": label_name} for id, label_name in enumerate(label_list)] coco_dict = {"info": "info",
"licenses": "BMLCloud", "images": coco_images, "annotations": coco_annotations, "categories":
coco_categories} with open(coco_json_file, 'w', encoding="utf-8") as fin: json.dump(coco_dict,
fin, ensure_ascii=False) def split_det_origin_dataset( origin_file_path, train_file_path,
 eval_file_path, ratio=0.7): """
    按比例切分物体检测原始数据集
    :return:
    """ coco = COCO(origin_file_path) img_ids = coco.getImgIds() items_num = len(img_ids) train_indexes,
eval_indexes = random_split_indexes(items_num, ratio) train_items = [img_ids[i] for i in train_indexes]
eval_items = [img_ids[i] for i in eval_indexes] dump_det_dataset(coco, train_items, train_file_path)
dump_det_dataset(coco, eval_items, eval_file_path) return items_num, len(train_items),
 len(eval_items) def random_split_indexes(items_num, ratio=0.7): """
    按比例分割整个list的index
    :return:分割后的两个index子列表
    """ offset = round(items_num * ratio) full_indexes = list(range(items_num)) random.
shuffle(full_indexes) sub_indexes_1 = full_indexes[:offset] sub_indexes_2 = full_indexes[offset:]
 return sub_indexes_1, sub_indexes_2 def dump_det_dataset(coco, img_id_list, save_file_path): """
    物体检测数据集保存
    :return:
    """ imgs = coco.loadImgs(img_id_list) img_anno_ids = coco.getAnnIds(imgIds=img_id_list,
iscrowd=0) instances = coco.loadAnns(img_anno_ids) cat_ids = coco.getCatIds() categories =
coco.loadCats(cat_ids) common_dict = { "info": coco.dataset["info"], "licenses":
coco.dataset["licenses"], "categories": categories } img_dict = { "image_nums":
len(imgs), "images": imgs, "annotations": instances } img_dict.update(common_dict)
json_file = open(save_file_path, 'w', encoding='UTF-8') json.dump(img_dict, json_file)
class_nums, label_list = parse_label_list("/home/work/data/${dataset_id}/",
"/home/work/PretrainedModel/") bml2coco("/home/work/data/${dataset_id}/",
"/home/work/PretrainedModel/org_data_list.json") split_det_origin_dataset
("/home/work/PretrainedModel/org_data_list.json", "/home/work/PretrainedModel/train_data_list.json",
"/home/work/PretrainedModel/eval_data_list.json")
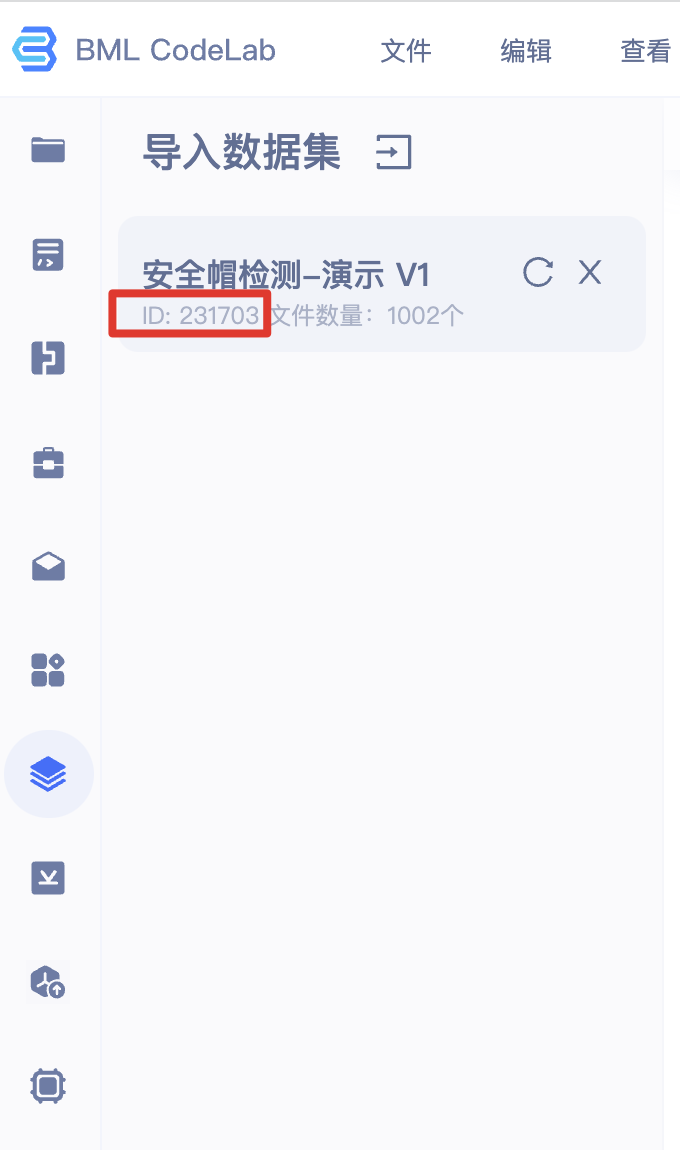
将上述脚本存放为 coversion.py 代码脚本,并将脚本最后两行的 ${dataset_id} 替换为所指定数据集的 ID(下图红框中的ID),在终端中运行即可。
运行代码。
python coversion.py
注意:如果报错 No module named 'pycocotools',需要通过如下命令安装相关依赖包,再运行 coversion.py 代码。
pip install pycocotools
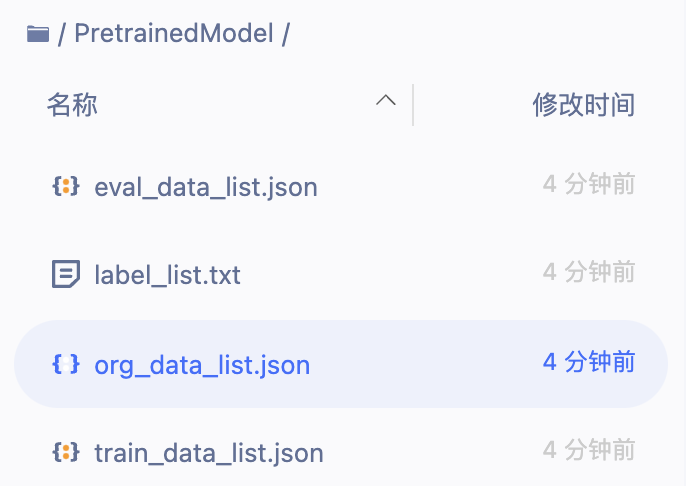
运行 coversion.py 代码成功之后将在 PretrainedModel/ 文件夹下生成对应的数据文件,包括 label_list.txt、train_data_list.json、eval_data_list.json、org_data_list.json。
训练模型
开发者准备好训练数据和安装环境之后即可开始训练物体检测模型。
1、在终端中打开 PaddleDetection 目录。
cd /home/work/PaddleDetection
2、修改yaml配置文件。
在PaddleDetection 2.0后续版本,采用了模块解耦设计,用户可以组合配置模块实现检测器,并可自由修改覆盖各模块配置,本文以 configs/yolov3/yolov3_darknet53_270e_coco.yml 为例:
yolov3_darknet53_270e_coco.yml 主配置入口文件
coco_detection.yml 主要说明了训练数据和验证数据的路径
runtime.yml 主要说明了公共的运行参数,比如说是否使用GPU、每多少个epoch存储checkpoint等
optimizer_270e.yml 主要说明了学习率和优化器的配置。
yolov3_darknet53.yml 主要说明模型、和主干网络的情况。
yolov3_reader.yml 主要说明数据读取器配置,如batch size,并发加载子进程数等,同时包含读取后预处理操作,如resize、数据增强等等
需要修改/覆盖的参数均可写在主配置入口文件中,主要修改点为训练、验证数据集路径、运行epoch数、学习率等,修改后的主配置文件如下(注释行即为需要修改的点):
_BASE_: [ '../datasets/coco_detection.yml', '../runtime.yml', '_base_/optimizer_270e.yml', '_base_/yolov3_darknet53.yml',
'_base_/yolov3_reader.yml', ] snapshot_epoch: 5 weights: output/yolov3_darknet53_270e_coco/model_final #
预训练权重地址 pretrain_weights: https://paddledet.bj.bcebos.com/models/yolov3_darknet53_270e_coco.pdparams
# coco_detection.yml num_classes: 2 #实际类别数 TrainDataset: !COCODataSet image_dir: data/${dataset_id}/
# 图片地址 anno_path: PretrainedModel/train_data_list.json # 标注文件 dataset_dir: /home/work/ #
数据集根目录 data_fields: ['image', 'gt_bbox', 'gt_class', 'is_crowd'] EvalDataset: !COCODataSet
image_dir: data/${dataset_id}/ # 图片地址 anno_path: PretrainedModel/eval_data_list.json #
标注文件 dataset_dir: /home/work/ # 数据集根目录 # optimizer_270e.yml epoch: 50 # 迭代轮数
LearningRate: base_lr: 0.0001 # 学习率 schedulers: - !PiecewiseDecay gamma: 0.1 milestones:
- 30 - 45 - !LinearWarmup start_factor: 0. steps: 400
3、训练模型。
在终端中执行以下命令,开始模型训练。
cd /home/work/PaddleDetection/
python tools/train.py -c configs/yolov3/yolov3_darknet53_270e_coco.yml --eval
注意:如果报错 No module named 'lap' 和 No module named 'motmetrics' ,则需要通过如下命令安装相关依赖包,
再运行 coversion.py 代码。(如果缺失其他模块,也可用类似命令下载安装)
pip install lap motmetrics
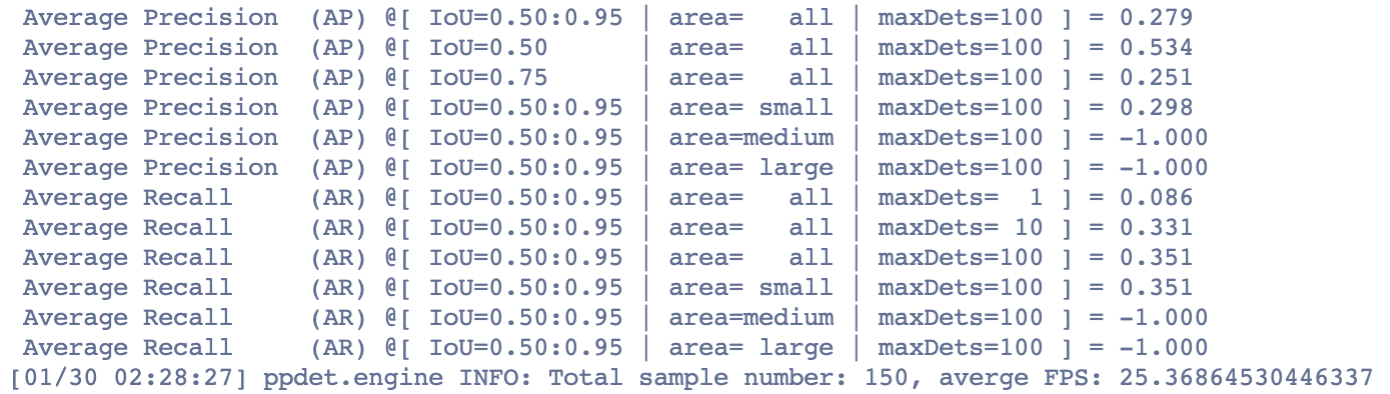
4、模型评估
在终端中执行以下命令,开始模型评估。
python tools/eval.py -c configs/yolov3/yolov3_darknet53_270e_coco.yml \
                     -o weights=output/yolov3_darknet53_270e_coco/model_final
运行完成输出如下结果:
5、模型预测。
在终端中执行以下命令,开始模型预测(注意修改图片路径)。
python tools/infer.py -c configs/yolov3/yolov3_darknet53_270e_coco.yml \ --infer_img=/home/work/data/${task_id}
/xxx.jpeg \ --output_dir=infer_output/ \ --draw_threshold=0.5 \ -o weights=output/yolov3_darknet53_270e_coco/model_final
6、导出模型。
在终端中执行以下命令,将最佳模型转为可以用于发布的 inference 模型
python tools/export_model.py -c configs/yolov3/yolov3_darknet53_270e_coco.yml
\ --output_dir=/home/work/PretrainedModel/ \ -o weights=output/yolov3_darknet53_270e_coco/model_final
在终端中执行以下命令,将导出模型移至 /home/work/PretrainedModel/ 目录。
mv /home/work/PretrainedModel/yolov3_darknet53_270e_coco/* /home/work/PretrainedModel/
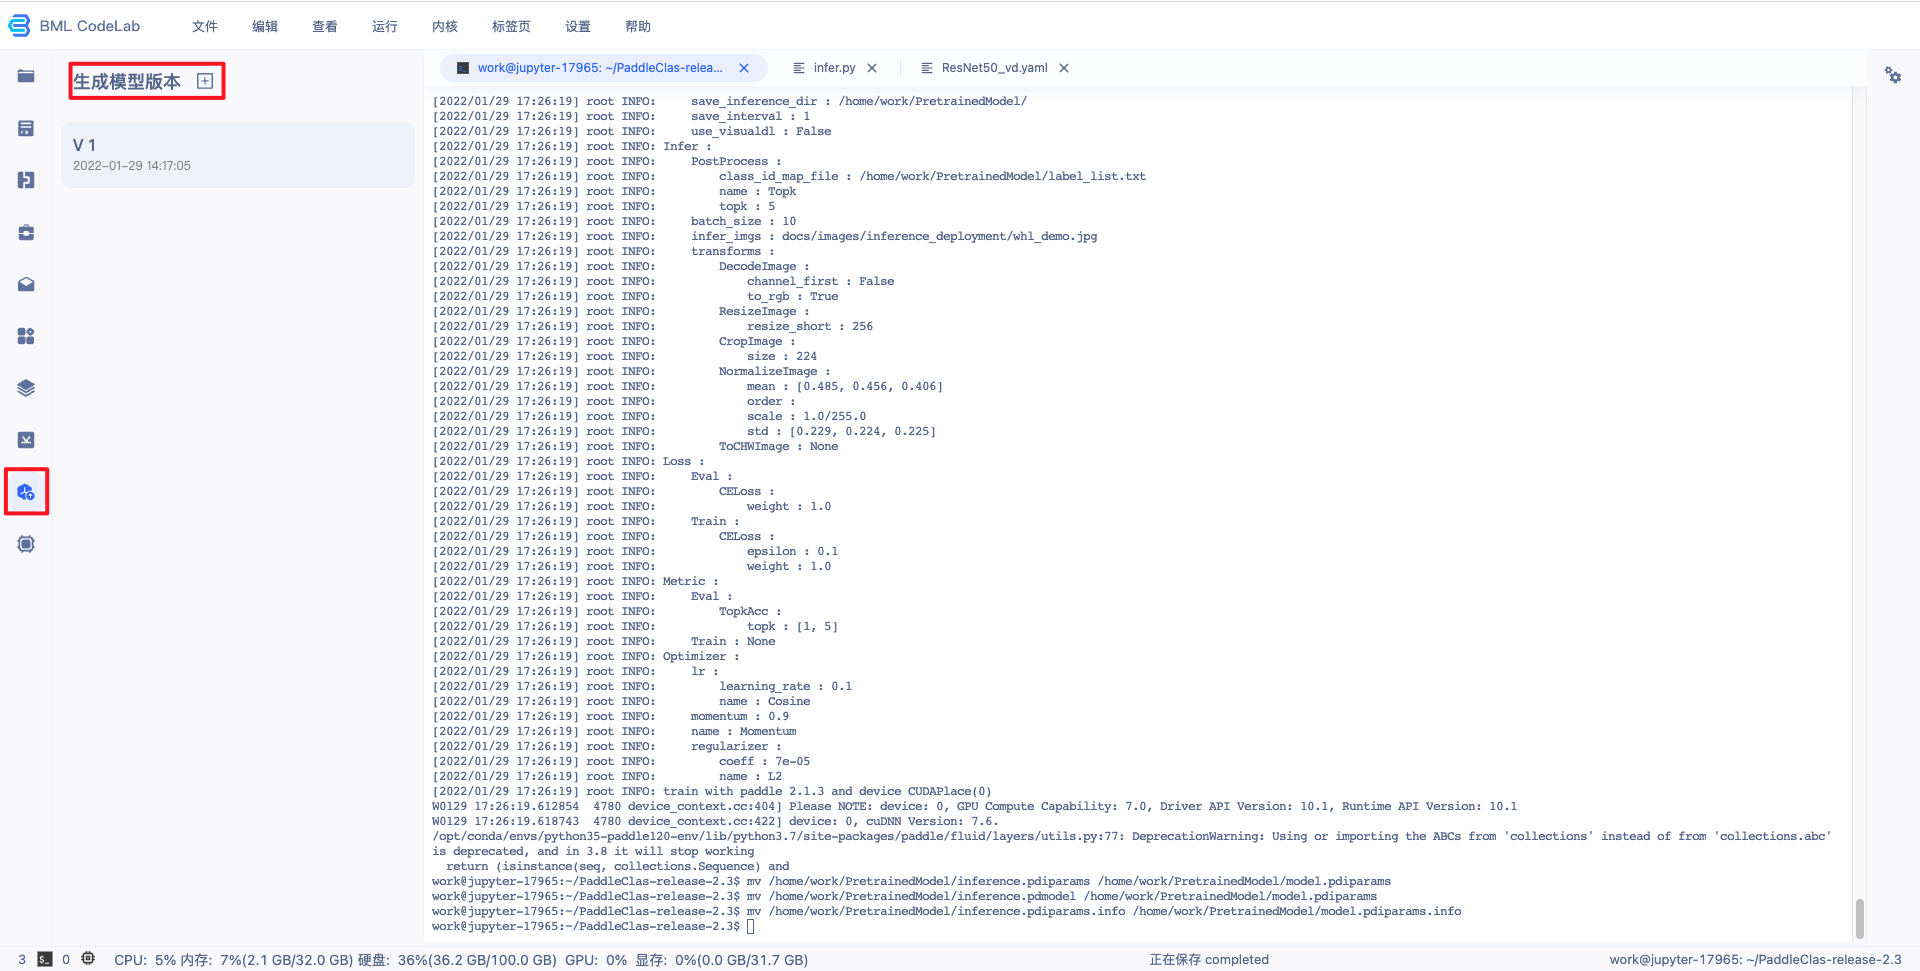
7、生成模型版本。
Notebook 中的模型文件只有生成模型版本后,才可以执行发布和部署功能:
- 请确保要保存的模型文件在/home/work/PretrainedModel目录下。模型支持版本管理功能,在保存时可以生成新版本也可以覆盖已有的且尚未部署的模型版本,每个版本的模型都可以独立部署。每个模型版本中保存的模型文件大小上限为1.5GB。
- 在保存模式时也可以将训练模型的代码一并保存。代码支持版本管理功能,用户再次启动Notebook时,可以使用指定的代码版本来初始化Notebook工作空间即/home/work目录下data以外的空间。每个代码版本中保存的文件大小上限为150M。
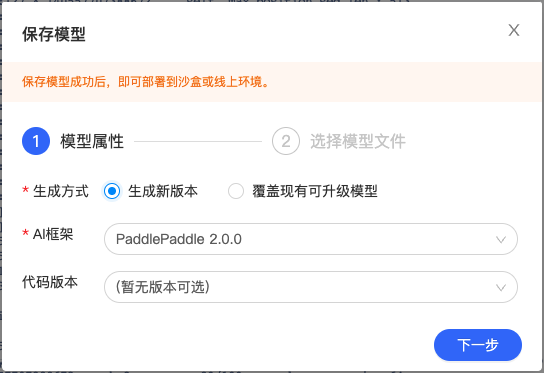
点击左侧导航栏中的生成模型版本组件,打开弹窗填写信息。
模型属性-选择 AI 框架选择 PaddlePaddle2.0.0,若上一次操作中进行了代码保存,可在“代码版本”选择对应的代码版本。
选择模型文件-选择 label_list.txt、model.pdiparams、model.pdmodel 、 infer_cfg.yaml 文件。
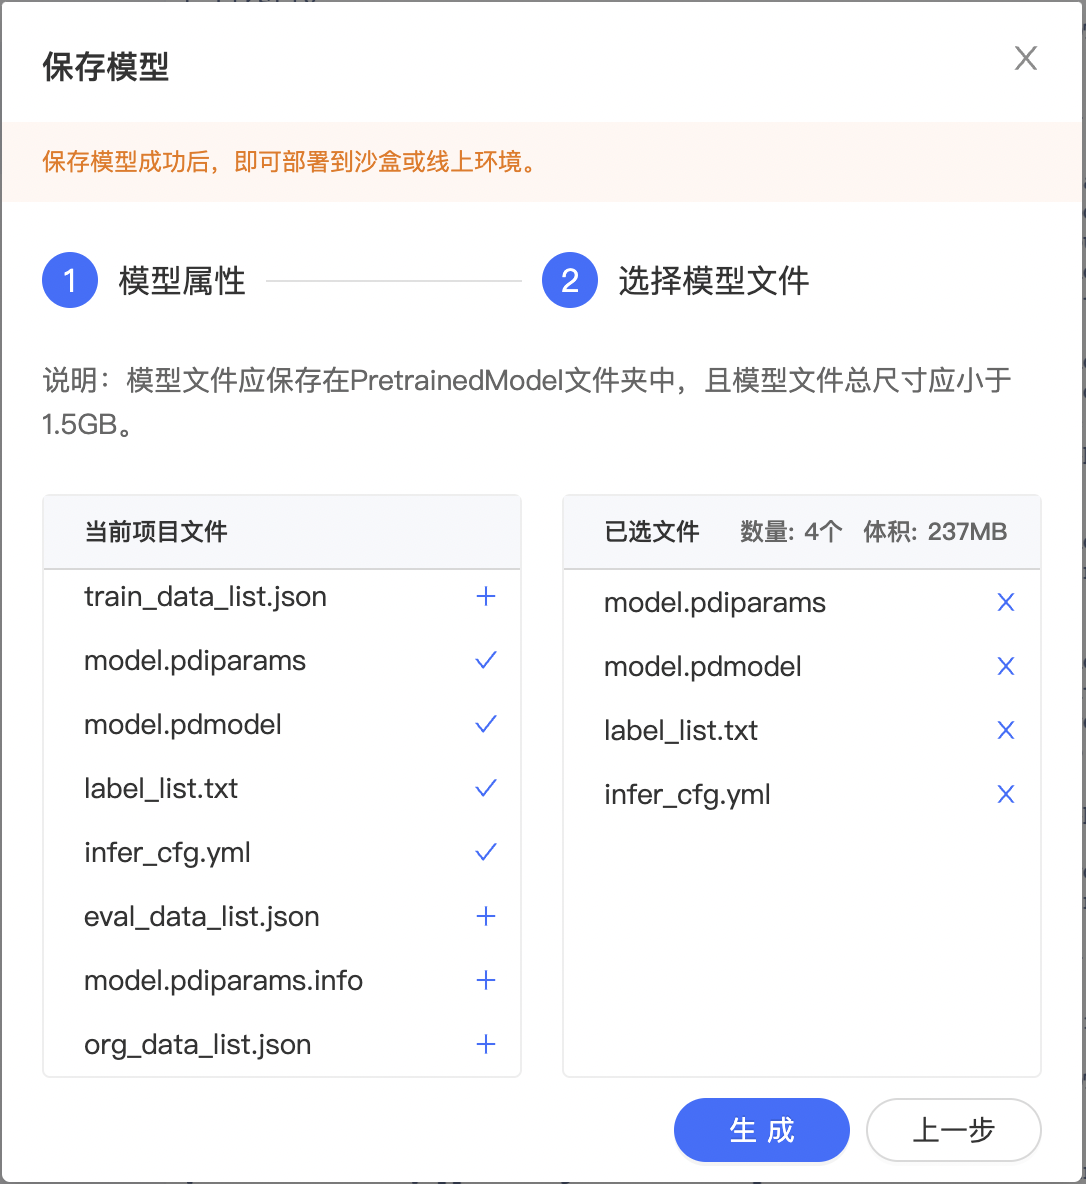
点击『生成』即可生成模型版本,生成模型版本一般需要数十秒,请耐心等待。
配置并发布模型
BML NoteBook 的物体检测模板产出的模型支持进行部署,下面以 PaddleDetection 的模型为例,详细介绍如何配置模型:
1、查看前置条件是否满足:需要训练完成,并生成了相应的模型生成版本(详见训练模型的第六步)。
2、回到 BML Notebook 列表页,点击对应 Notebook 项目的『模型发布列表』即可进入配置页面。

3、点击配置,即可进入配置流程。

4、填写模型信息。

5、选择待发布的模型文件,点击确定按钮。
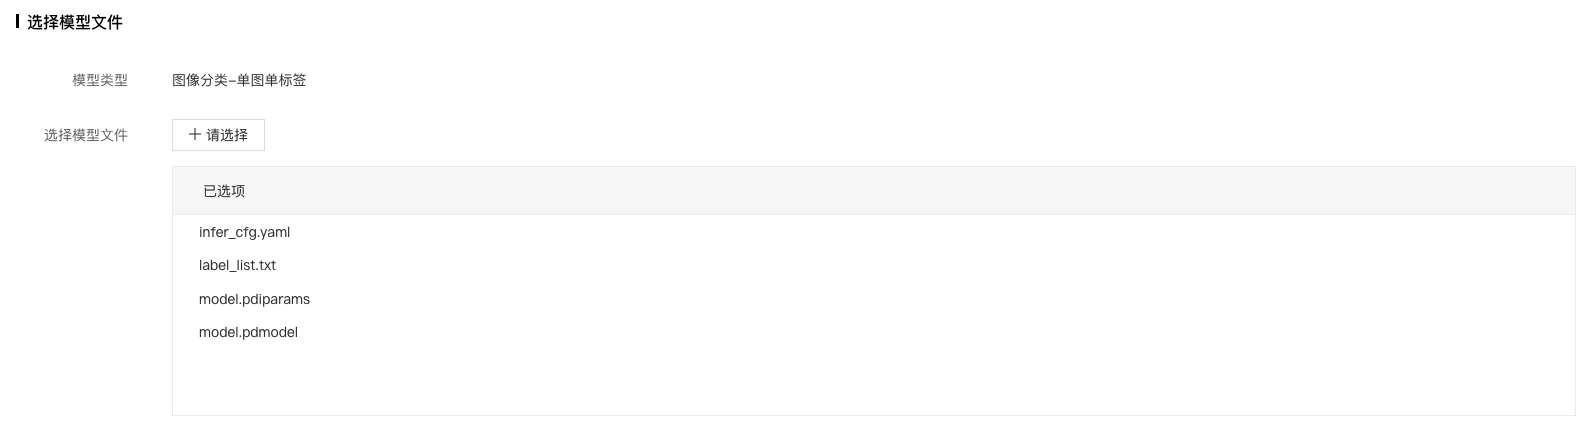
对于 Paddle2.x 的模型而言:
- 网络结构文件 model.pdmodel:必需选择,且名字固定。
- 网络参数文件 model.pdiparams:必需选择,且名字固定。
- 模型标签文件:label_list.txt,非必须,主要看自定义逻辑代码是如何实现的。本文中在【配置出入参及数据处理逻辑脚本】的脚本代码里面会用到,所以需要选择。
- 预/后处理配置文件等其他文件:infer_cfg.yaml,非必须,主要看自定义逻辑代码是如何实现的。本文中在【配置出入参及数据处理逻辑脚本】的脚本代码里面会用到,所以需要选择。
6、配置出入参及数据逻辑处理。
这部分配置主要实现自定义的模型预处理和后处理逻辑。该脚本用于将选择的模型文件发布成模型服务。用户可以通过修改 PredictWrapper 的 preprocess 和 postprocess 方法来实现自定义的请求预处理和预测结果后处理。当提交该脚本时,系统会根据用户选择的模型文件和脚本内容,来验证是否可以启动模型服务,只有验证通过,才可以进行模型效果校验以及将模型发布到模型仓库。
实现脚本有一些建议和限制:
- CustomException 必需存在且是异常类;在自定义的逻辑中,建议当处理进入错误的分支时,抛出 CustomException 并指定 message,指定的 message 在请求回包中会作为 error_msg 返回。
- PredictWrapper 类必需存在,且必需包含 preprocess 和 postprocess 两个方法。
- PredictWrapper 的 preprocess 和 postprocess 方法,是用户自定义模型服务请求预处理和预测结果后处理的入口。
- preprocess 方法接收的第一个参数为用户请求的 json 字典,对于图像类服务,传入图像的参数 key 必须是"image",且传入的是图片的 base64 编码。
-
系统会根据 postprocess 方法的返回结果 result 类型的不同,做以下处理:
- dict: 不作修改 - list: 转换为 {"results": result}- 其他: 转换为 {"result": result}
- 最终的处理结果可以转换为json字符串,以确保能够正常将结果作为请求回包返回
- 单击“提交”,完成模型配置。 提交后,系统会自动对当前版本模型进行代码验证,通过后模型会更新为“有效”状态。
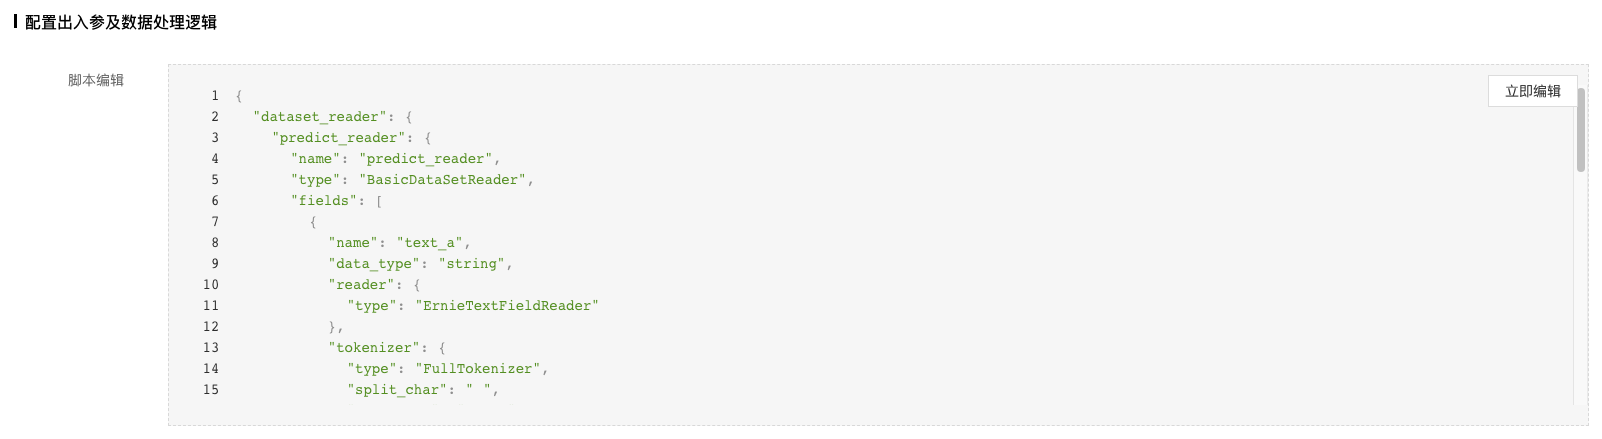
配置出入参及数据处理逻辑脚本:实现图片的预处理和模型输出结果后处理的逻辑;这一步是比较关键,但也比较复杂的一步。上面介绍了脚本实现时的限制和建议。这里针对PaddleDetection套件,实现了一套对应的脚本代码(在后面),可以点击立即编辑,将脚本代码拷贝替换掉。
注:
可以看下平台预置代码文件,以及各个类及函数的注释了解实现细节。这里贴了PaddleDetection套件对应的脚本文件,整个代码比较长,但大部分内容都拷贝于PaddleDetection套件的推理示例。如果自身训练模型比较特殊,当前脚本支持不了,需要自己去PaddleDetection套件中寻找逻辑,并更新到该脚本中。
PaddleDetection脚本样例:
#!/usr/bin/env python # -*- coding: utf-8 -*- # *******************************************************************************
# # Copyright (c) 2020 Baidu.com, Inc. All Rights Reserved # # ************************************************
******************************* # 注意事项: # 该脚本用于将通过notebook训练产出的模型发布成模型服务 #
用户可以通过修改PredictWrapper的preprocess和postprocess方法来实现自定义的请求预处理和预测结果后处理
# 当在EasyDL提交该脚本时,系统会根据用户选择的模型文件和脚本内容,来验证是否可以启动模型服务,
如果验证通过,即可进行模型效果校验以及部署模型服务 #
下面是修改脚本的一些限制和建议: # 1. CustomException必须存在且是异常类;在自定义的逻辑中,
建议当处理进入错误的分支时,抛出CustomException并指定message,指定的message在请求回包中会作为error_msg返回
; # 2. PredictWrapper类必须存在,且必需包含preprocess和postprocess两个方法;
# 3. PredictWrapper的preprocess和postprocess方法,是用户自定义模型服务请求预处理和预测结果后处理的入口;
# 4. preprocess方法接收的第一个参数为用户请求的json字典,对于图像类服务,传入图像的参数key必须是"image"
,且传入的是图片的base64编码 # 5. 系统会根据postprocess方法的返回结果`result`类型的不同,做以下处理: #
dict: 不作修改 # list: 转换为 {"results": result} # 其他: 转换为 {"result": result} #
处理结果将转换为json字符串,以确保系统能正常将结果作为请求回包返回。 import base64 import cv2 import numpy as np import yaml
DEFAULT_THRESHOLD = 0.5 class CustomException(RuntimeError): """
    进行模型验证和部署服务必需的异常类,缺少该类在代码验证时将会失败
    在处理异常数据或者请求时,推荐在`PredictWrapper`中的自定义预处理preprocess和后处理postprocess函数中抛出`CustomException`类,
    并为`message`指定准确可读的错误信息,以便在服务响应包中的`error_msg`参数中返回。
    """ def __init__(self, message, orig_error=None): """ 根据`message`初始化 """ super(CustomException, self)
.__init__(message) self.orig_error = orig_error class PredictWrapper(object): """ 模型服务预测封装类,
支持用户自定义对服务请求数据的预处理和模型预测结果的后处理函数 """ def __init__(self, model_path): """
        根据`model_path`初始化`PredictWrapper`类,如解析label_list.txt,加载模型输出标签id和标签名称的映射关系
        :param model_path: 该目录下存放了用户选择的模型版本中包含的所有文件
        """ # 加载推理配置文件,获取【预处理配置】及【标签id和名称的映射关系】 conf_path = '{model_path}/{conf_file}'.
format(model_path=model_path, conf_file='infer_cfg.yml') with open(conf_path) as conf_fin: infer_conf =
yaml.load(conf_fin, Loader=yaml.FullLoader) self._preprocess_args = infer_conf["Preprocess"] self
._label_list = infer_conf["label_list"] def preprocess(self, request_body, **preprocess_args): """
        自定义对请求体的预处理,针对图像类模型服务,包括对图片对图像的解析、转化等
        :param request_body: 请求体的json字典
        :param preprocess_args: 从`{model_path}/preprocess_args.json`中加载的预处理参数字典,json文件不存在时,传入为空字典
        :return:
            data: 用于模型预测的输入。注意:data结构为dict,key为模型输入节点的名称,value为对应需要喂入的值,batch只能为1
            infer_args: 用于模型预测的其他参数
            request_context: 透传给自定义后处理函数`postprocess`的参数,例如指定返回预测结果的top N,过滤低score的阈值threshold.
        """ # decode image from base64 string in request try: image_b64 = request_body['image'] img_bin =
base64.b64decode(image_b64) except KeyError: raise CustomException('Missing required parameter')
except Exception: raise CustomException('Invalid BASE64') data = np.frombuffer(img_bin, dtype='uint8')
im = cv2.imdecode(data, 1) # BGR mode, but need RGB mode im = cv2.cvtColor(im, cv2.COLOR_BGR2RGB) #
paddle detection preprocess # code: https://github.com/PaddlePaddle/PaddleDetection/blob/develop
/deploy/python/infer.py#L99 try: preprocess_ops = [] for op_info in self._preprocess_args: new_op_info =
op_info.copy() op_type = new_op_info.pop('type') preprocess_ops.append(eval(op_type)(**new_op_info))
input_im_lst = [] input_im_info_lst = [] im, im_info = preprocess(im, preprocess_ops) input_im_lst.
append(im) input_im_info_lst.append(im_info) input_info = create_inputs(input_im_lst, input_im_info_lst)
except Exception: raise CustomException('Failed decoding input') return input_info, {}, {"threshold":
request_body.get("threshold", DEFAULT_THRESHOLD)} def postprocess(self, infer_result, request_context,
**postprocess_args): """
        自定义对图像分类模型输出结果的后处理,例如根据score对label进行排序,获取top N分类结果等
        :param infer_result: fluid模型的预测结果
        :param request_context: 自定义预处理函数中返回的`request context`
        :param postprocess_args: 从`{model_path}/postprocess_args.json`中加载的后处理参数字典,json文件不存在时,传入为空字典
        :return: request results 请求的处理结果
        """ threshold = request_context["threshold"] boxes = infer_result[0] bboxes_num = int(infer_result[1][0])
results = [] for i in range(bboxes_num): box_info = boxes[i, :] label = int(box_info[0]) score = float(box_info[1])
x1 = int(box_info[2]) y1 = int(box_info[3]) x2 = int(box_info[4]) y2 = int(box_info[5]) if score < threshold:
continue results.append({ 'name': self._label_list[label], 'score': score, 'location': { 'left': x1, 'top':
y1, 'width': x2 - x1, 'height': y2 - y1, } }) return results # copy from PaddleDetection: https://github.
com/PaddlePaddle/PaddleDetection/blob/develop/deploy/python/preprocess.py # note: Only copy used preprocess
OPs, if model used other op, show copy into this file def preprocess(im, preprocess_ops): # process image
by preprocess_ops im_info = { 'scale_factor': np.array( [1., 1.], dtype=np.float32), 'im_shape': None,
im, im_info = decode_image(im, im_info) for operator in preprocess_ops: im, im_info = operator(im,
im_info) return im, im_info def decode_image(im_file, im_info): """read rgb image
    Args:
        im_file (str|np.ndarray\bytes): input can be image path or np.ndarray
        im_info (dict): info of image
    Returns:
        im (np.ndarray):  processed image (np.ndarray)
        im_info (dict): info of processed image
    """ if isinstance(im_file, str): with open(im_file, 'rb') as f: im_read = f.read() data = np.frombuffer(im_read,
dtype='uint8') im = cv2.imdecode(data, 1) # BGR mode, but need RGB mode im =
cv2.cvtColor(im, cv2.COLOR_BGR2RGB) else: im = im_file
    im_info['im_shape'] = np.array(im.shape[:2], dtype=np.float32) im_info['scale_factor']
= np.array([1., 1.], dtype=np.float32) return im, im_info class Resize(object):
 """resize image by target_size and max_size
    Args:
        target_size (int): the target size of image
        keep_ratio (bool): whether keep_ratio or not, default true
        interp (int): method of resize
    """ def __init__(self, target_size, keep_ratio=True, interp=cv2.INTER_LINEAR):
 if isinstance(target_size, int): target_size = [target_size, target_size] self.target_size = target_size
        self.keep_ratio = keep_ratio
        self.interp = interp def __call__(self, im, im_info): """
        Args:
            im (np.ndarray): image (np.ndarray)
            im_info (dict): info of image
        Returns:
            im (np.ndarray):  processed image (np.ndarray)
            im_info (dict): info of processed image
        """ assert len(self.target_size) == 2 assert self.target_size[0] > 0 and self.target_size[1]
> 0 im_channel = im.shape[2] im_scale_y, im_scale_x = self.generate_scale(im) im = cv2.resize( im,
None, None, fx=im_scale_x, fy=im_scale_y, interpolation=self.interp) im_info['im_shape'] = np.
array(im.shape[:2]).astype('float32') im_info['scale_factor'] = np.array( [im_scale_y, im_scale_x])
.astype('float32') return im, im_info def generate_scale(self, im): """
        Args:
            im (np.ndarray): image (np.ndarray)
        Returns:
            im_scale_x: the resize ratio of X
            im_scale_y: the resize ratio of Y
        """ origin_shape = im.shape[:2] im_c = im.shape[2] if self.keep_ratio: im_size_min
= np.min(origin_shape) im_size_max = np.max(origin_shape) target_size_min = np.min(self.target_size)
target_size_max = np.max(self.target_size) im_scale = float(target_size_min) / float(im_size_min)
if np.round(im_scale * im_size_max) > target_size_max: im_scale = float(target_size_max) /
 float(im_size_max) im_scale_x = im_scale
            im_scale_y = im_scale else: resize_h, resize_w = self.target_size
            im_scale_y = resize_h / float(origin_shape[0]) im_scale_x = resize_w /
float(origin_shape[1]) return im_scale_y, im_scale_x class NormalizeImage(object): """normalize image
    Args:
        mean (list): im - mean
        std (list): im / std
        is_scale (bool): whether need im / 255
        is_channel_first (bool): if True: image shape is CHW, else: HWC
    """ def __init__(self, mean, std, is_scale=True): self.mean = mean
        self.std = std
        self.is_scale = is_scale def __call__(self, im, im_info): """
        Args:
            im (np.ndarray): image (np.ndarray)
            im_info (dict): info of image
        Returns:
            im (np.ndarray):  processed image (np.ndarray)
            im_info (dict): info of processed image
        """ im = im.astype(np.float32, copy=False) mean = np.array(self.mean)[np.newaxis, np.newaxis, :]
 std = np.array(self.std)[np.newaxis, np.newaxis, :] if self.is_scale: im = im / 255.0 im -= mean
        im /= std return im, im_info class Permute(object): """permute image
    Args:
        to_bgr (bool): whether convert RGB to BGR
        channel_first (bool): whether convert HWC to CHW
    """ def __init__(self, ): super(Permute, self).__init__() def __call__(self, im, im_info): """
        Args:
            im (np.ndarray): image (np.ndarray)
            im_info (dict): info of image
        Returns:
            im (np.ndarray):  processed image (np.ndarray)
            im_info (dict): info of processed image
        """ im = im.transpose((2, 0, 1)).copy() return im, im_info class PadStride(object): "
"" padding image for model with FPN, instead PadBatch(pad_to_stride) in original config
    Args:
        stride (bool): model with FPN need image shape % stride == 0
    """ def __init__(self, stride=0): self.coarsest_stride = stride def __call__(self, im, im_info): """
        Args:
            im (np.ndarray): image (np.ndarray)
            im_info (dict): info of image
        Returns:
            im (np.ndarray):  processed image (np.ndarray)
            im_info (dict): info of processed image
        """ coarsest_stride = self.coarsest_stride if coarsest_stride <= 0: return im, im_info
        im_c, im_h, im_w = im.shape
        pad_h = int(np.ceil(float(im_h) / coarsest_stride) * coarsest_stride) pad_w = int(np.ceil(float(im_w)
/ coarsest_stride) * coarsest_stride) padding_im = np.zeros((im_c, pad_h, pad_w), dtype=np.float32)
padding_im[:, :im_h, :im_w] = im return padding_im, im_info class LetterBoxResize(object): def
 __init__(self, target_size): """
        Resize image to target size, convert normalized xywh to pixel xyxy
        format ([x_center, y_center, width, height] -> [x0, y0, x1, y1]).
        Args:
            target_size (int|list): image target size.
        """ super(LetterBoxResize, self).__init__() if isinstance(target_size, int): target_size =
[target_size, target_size] self.target_size = target_size def letterbox(self, img, height, width,
color=(127.5, 127.5, 127.5)): # letterbox: resize a rectangular image to a padded rectangular
shape = img.shape[:2] # [height, width] ratio_h = float(height) / shape[0] ratio_w = float(width)
/ shape[1] ratio = min(ratio_h, ratio_w) new_shape = (round(shape[1] * ratio), round(shape[0]
* ratio)) # [width, height] padw = (width - new_shape[0]) / 2 padh = (height - new_shape[1])
/ 2 top, bottom = round(padh - 0.1), round(padh + 0.1) left, right = round(padw - 0.1), round(padw + 0.1)
img = cv2.resize( img, new_shape, interpolation=cv2.INTER_AREA) # resized, no border img =
cv2.copyMakeBorder( img, top, bottom, left, right, cv2.BORDER_CONSTANT, value=color) #
 padded rectangular return img, ratio, padw, padh def __call__(self, im, im_info): """
        Args:
            im (np.ndarray): image (np.ndarray)
            im_info (dict): info of image
        Returns:
            im (np.ndarray):  processed image (np.ndarray)
            im_info (dict): info of processed image
        """ assert len(self.target_size) == 2 assert self.target_size[0] > 0 and self.target_size[1]
> 0 height, width = self.target_size
        h, w = im.shape[:2] im, ratio, padw, padh = self.letterbox(im, height=height, width=width)
new_shape = [round(h * ratio), round(w * ratio)] im_info['im_shape'] = np.array(new_shape,
dtype=np.float32) im_info['scale_factor'] = np.array([ratio, ratio], dtype=np.float32) return im,
 im_info def create_inputs(imgs, im_info): """generate input for different model type
    Args:
        imgs (list(numpy)): list of images (np.ndarray)
        im_info (list(dict)): list of image info
    Returns:
        inputs (dict): input of model
    """ inputs = {} im_shape = [] scale_factor = [] if len(imgs) == 1: inputs['image'] = np.array((imgs[0], )
).astype('float32') inputs['im_shape'] = np.array( (im_info[0]['im_shape'], )).astype('float32')
inputs['scale_factor'] = np.array( (im_info[0]['scale_factor'], )).astype('float32')
return inputs for e in im_info: im_shape.append(np.array((e['im_shape'], )).astype('float32'))
scale_factor.append(np.array((e['scale_factor'], )).astype('float32')) inputs['im_shape'] =
np.concatenate(im_shape, axis=0) inputs['scale_factor'] = np.concatenate(scale_factor, axis=0)
imgs_shape = [[e.shape[1], e.shape[2]] for e in imgs] max_shape_h = max([e[0] for e in imgs_shape])
max_shape_w = max([e[1] for e in imgs_shape]) padding_imgs = [] for img in imgs: im_c, im_h, im_w
 = img.shape[:] padding_im = np.zeros( (im_c, max_shape_h, max_shape_w), dtype=np.float32) padding_im[:, :im_h, :im_w] = img
        padding_imgs.append(padding_im) inputs['image'] = np.stack(padding_imgs, axis=0) return inputs
7、点击提交即可进入模型验证阶段,验证时间一般需要数十秒,请耐心等待。

验证通过后,显示有效。

8、点击发布,填写相关信息后,即可发布成功。
9、点击左侧导航栏模型管理,即可查看发布成功的模型。
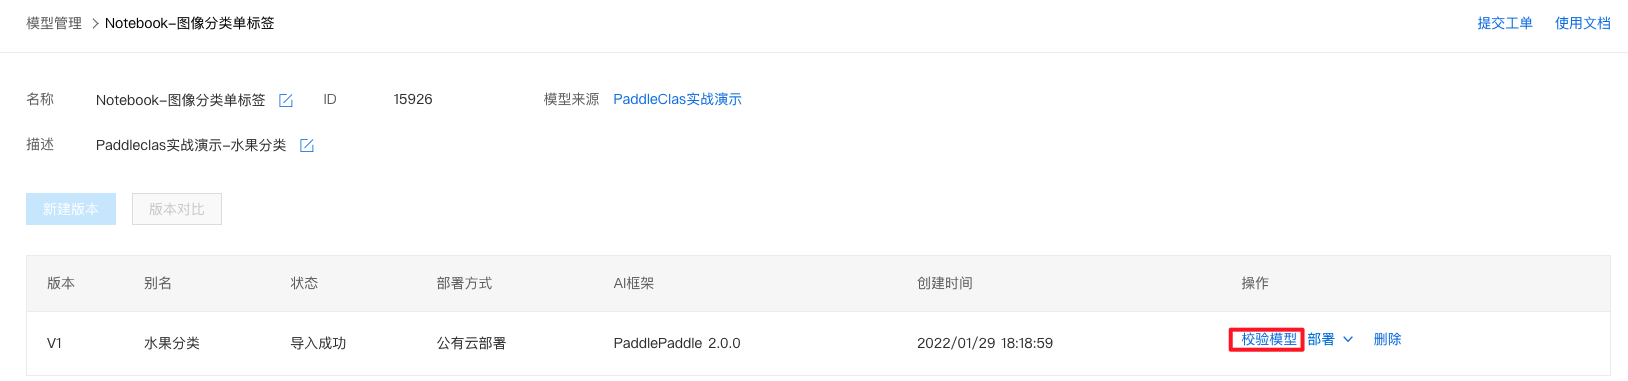
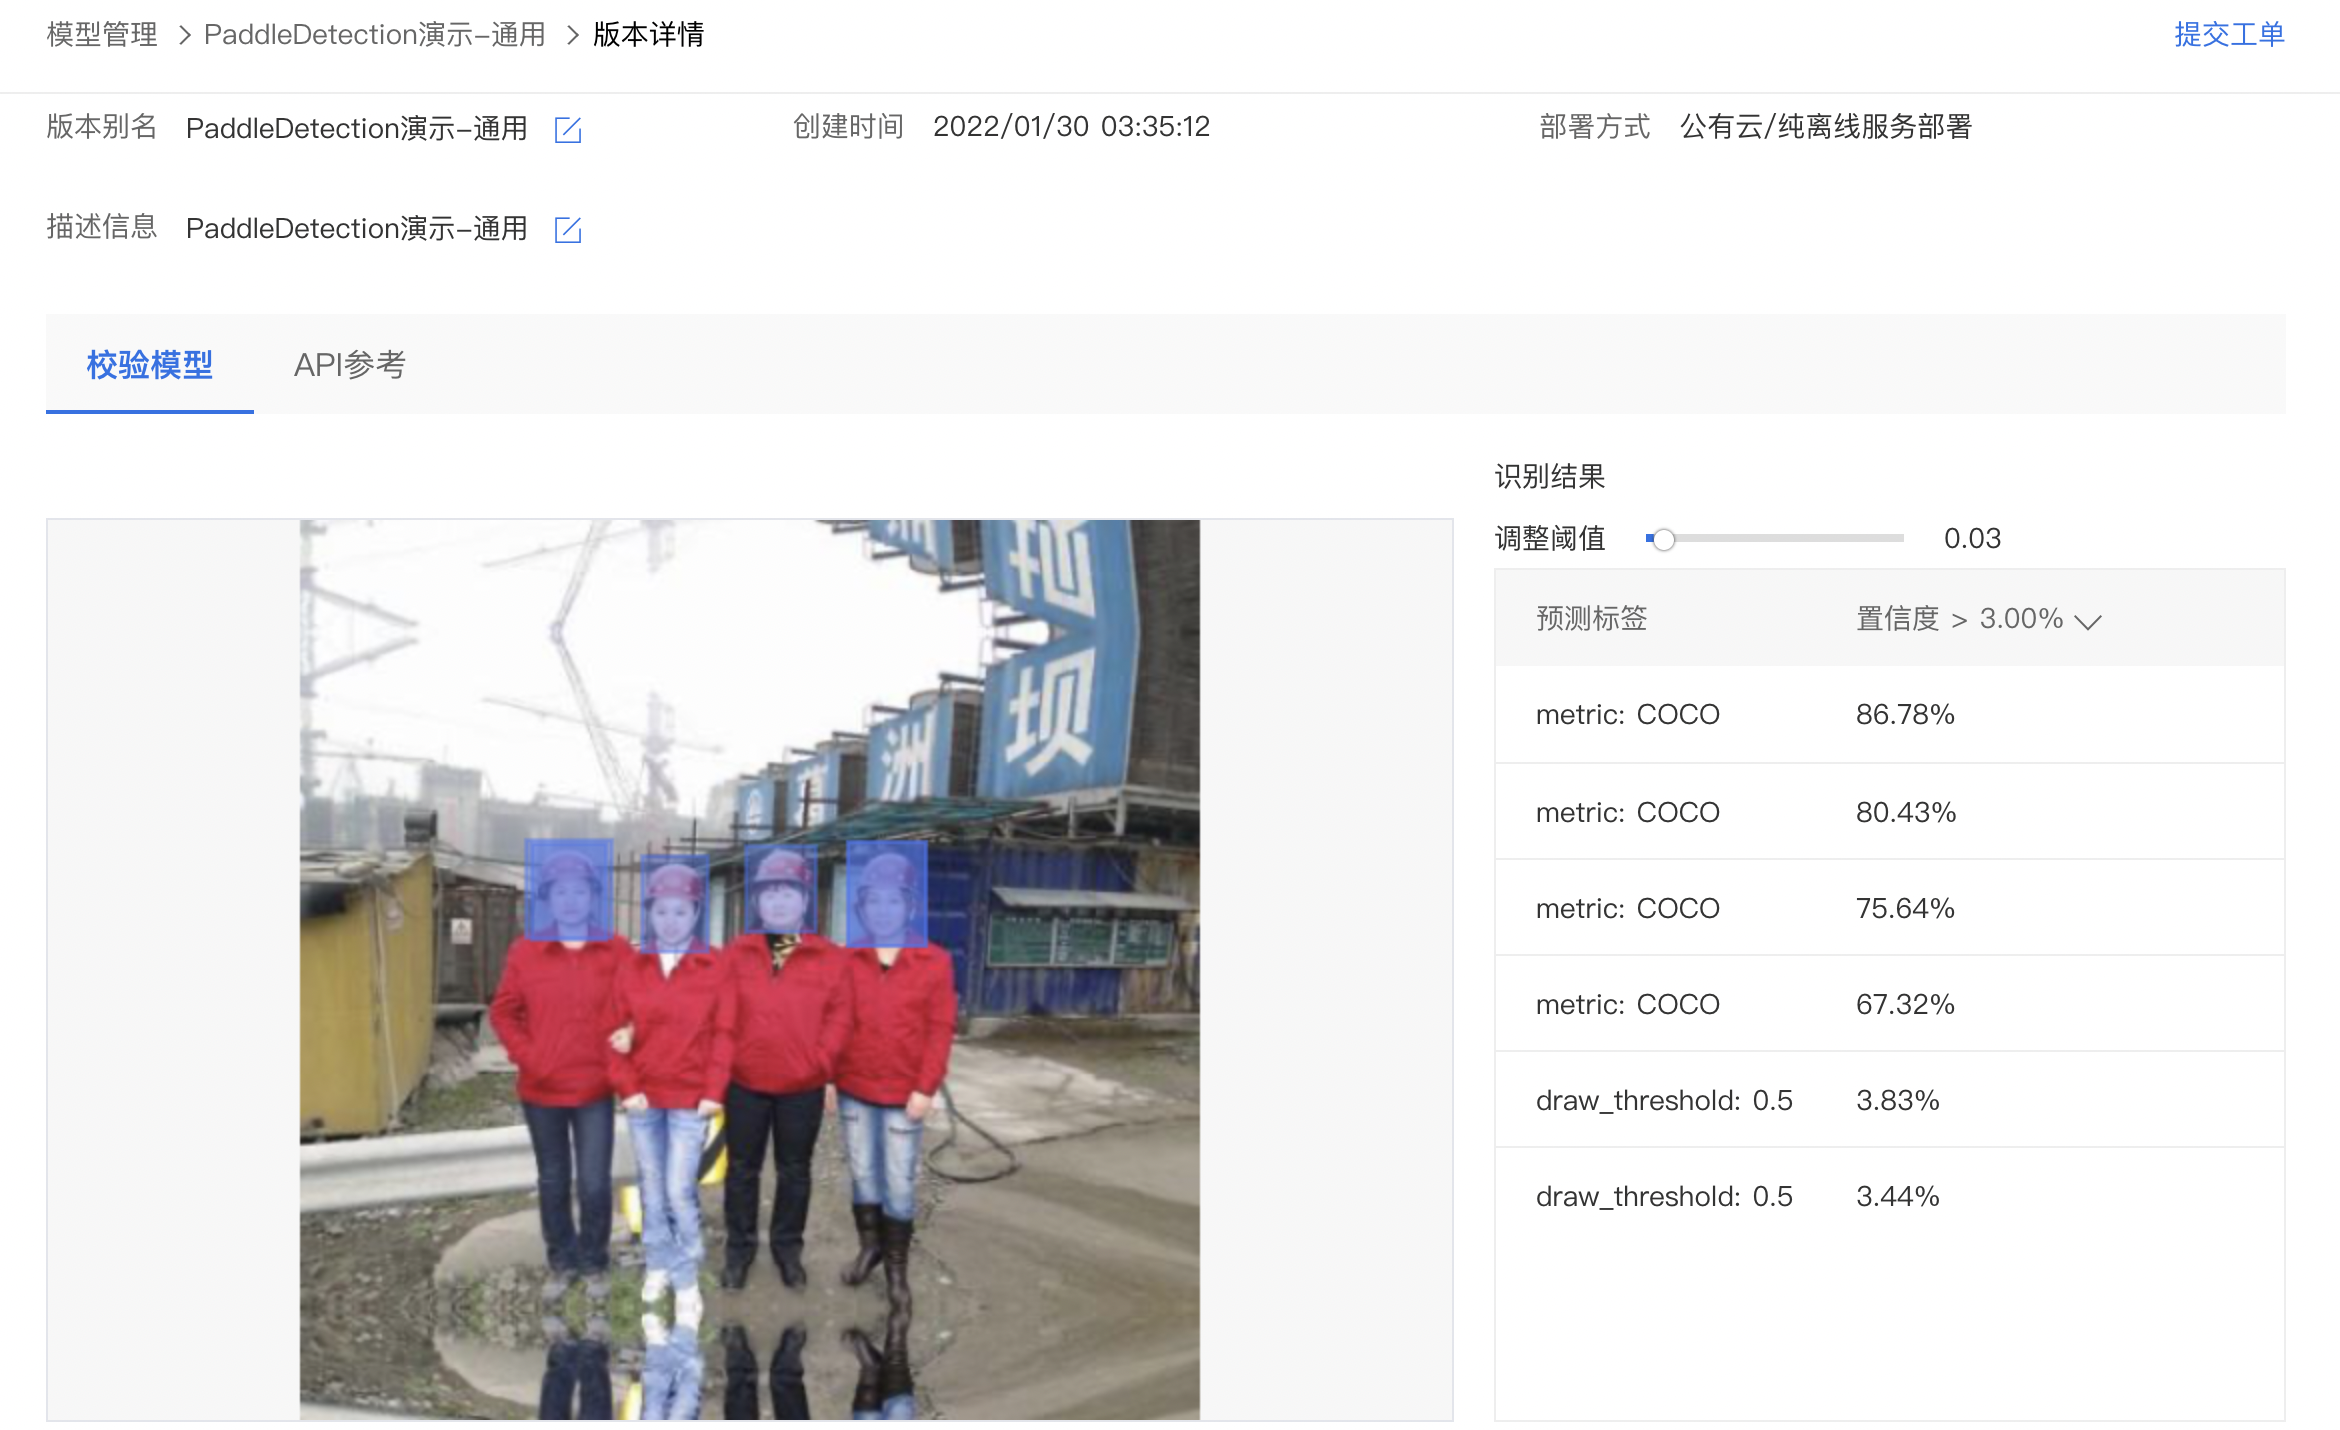
校验模型
1、点击『版本列表』。

2、点击『校验模型』。
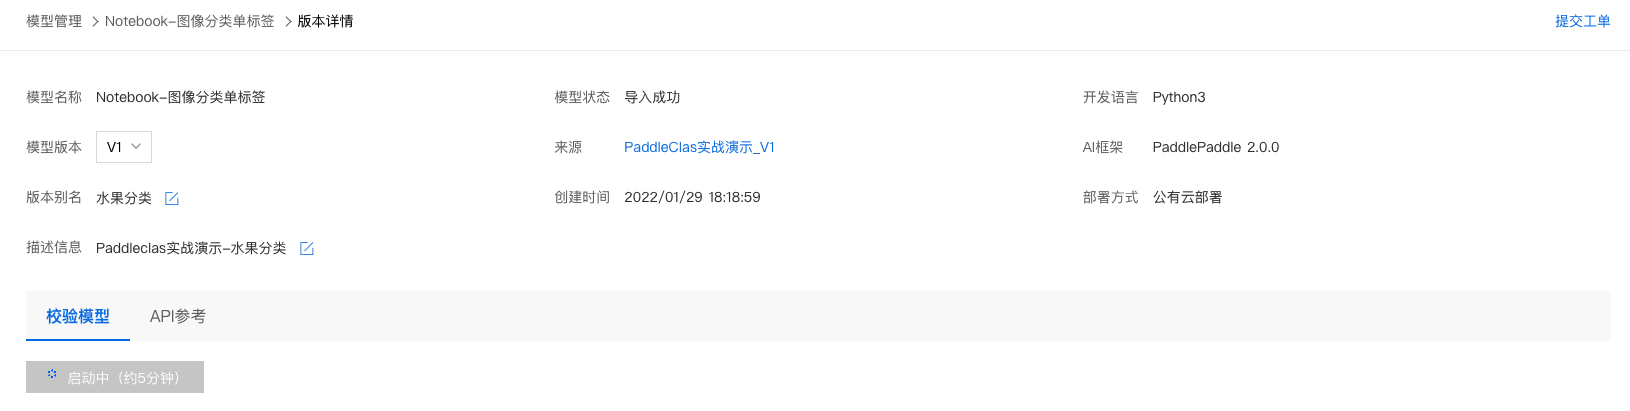
3、点击『启动模型校验』,启动约需5分钟,请耐心等待。
4、上传图像即可开始校验,示例如下:
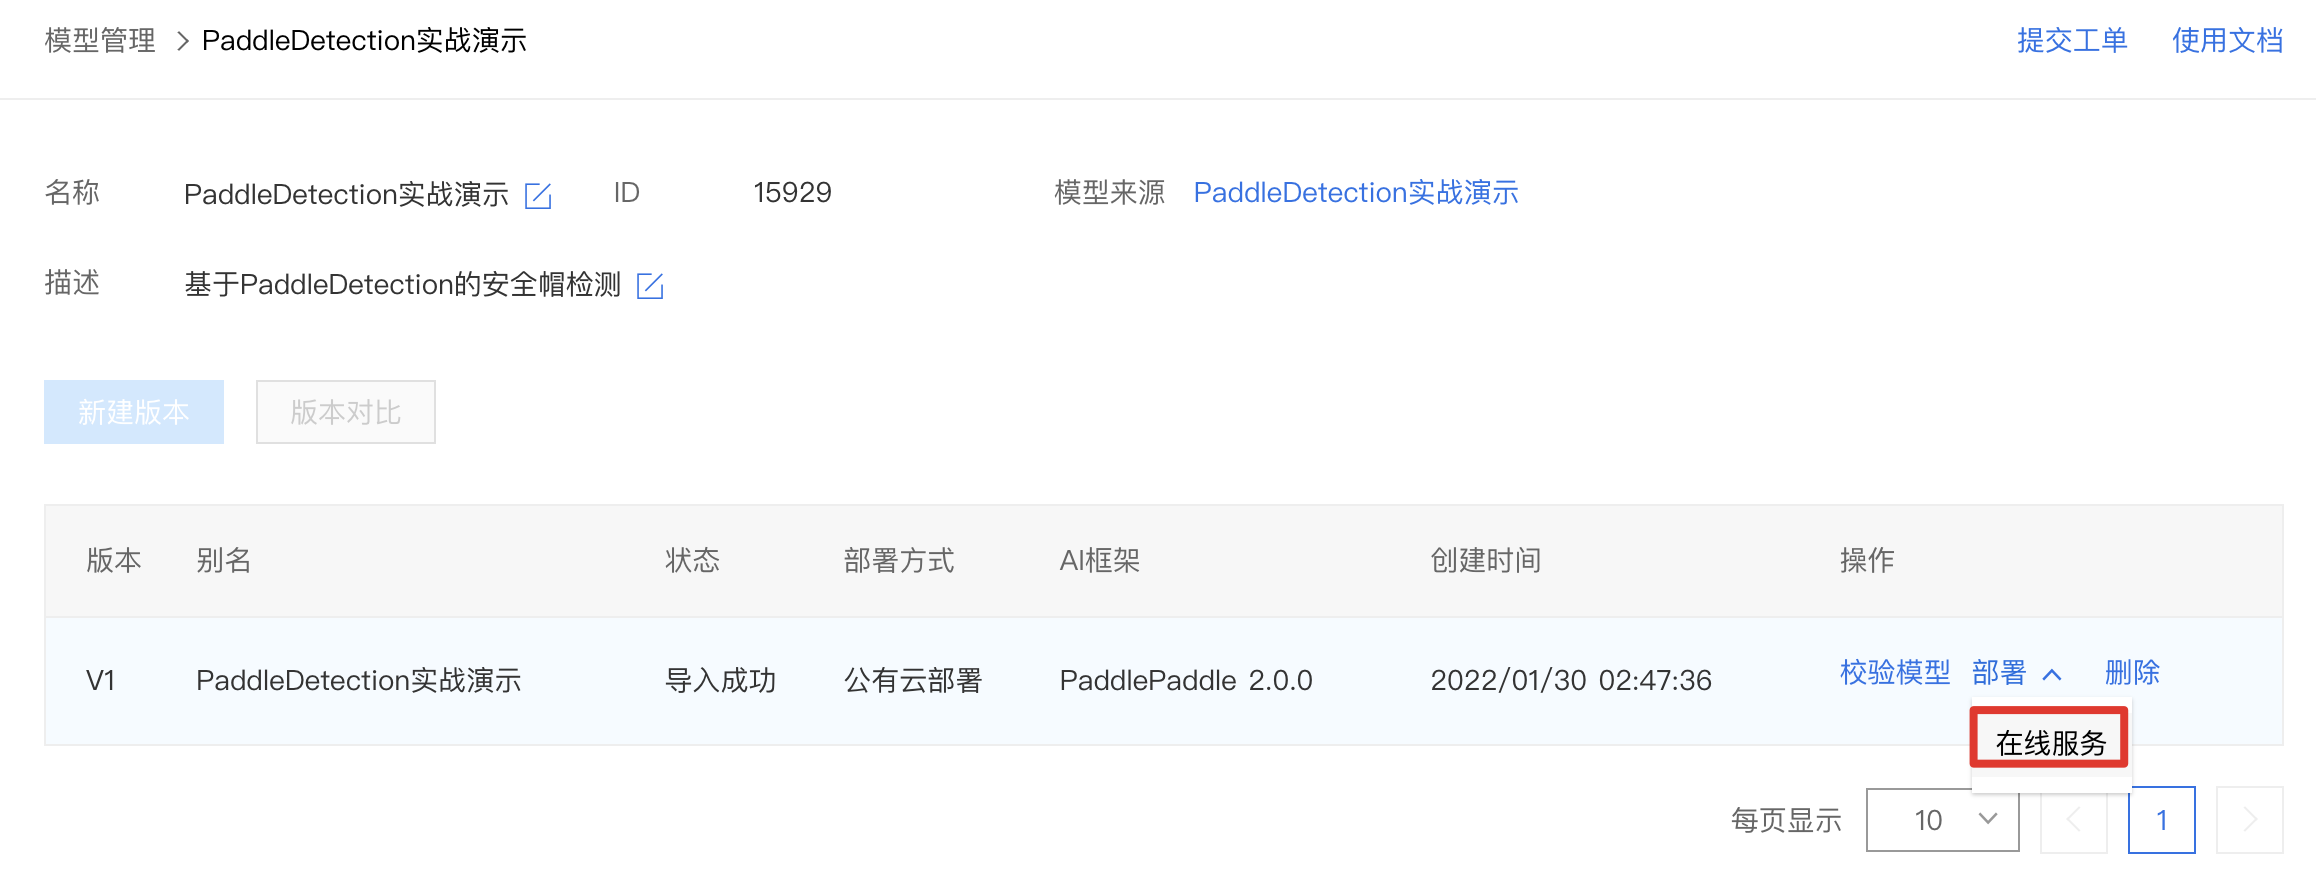
部署在线服务
1、点击『版本列表』。

2、点击部署-在线服务。
3、完成信息填写及资源规格选择后,即可开始部署。
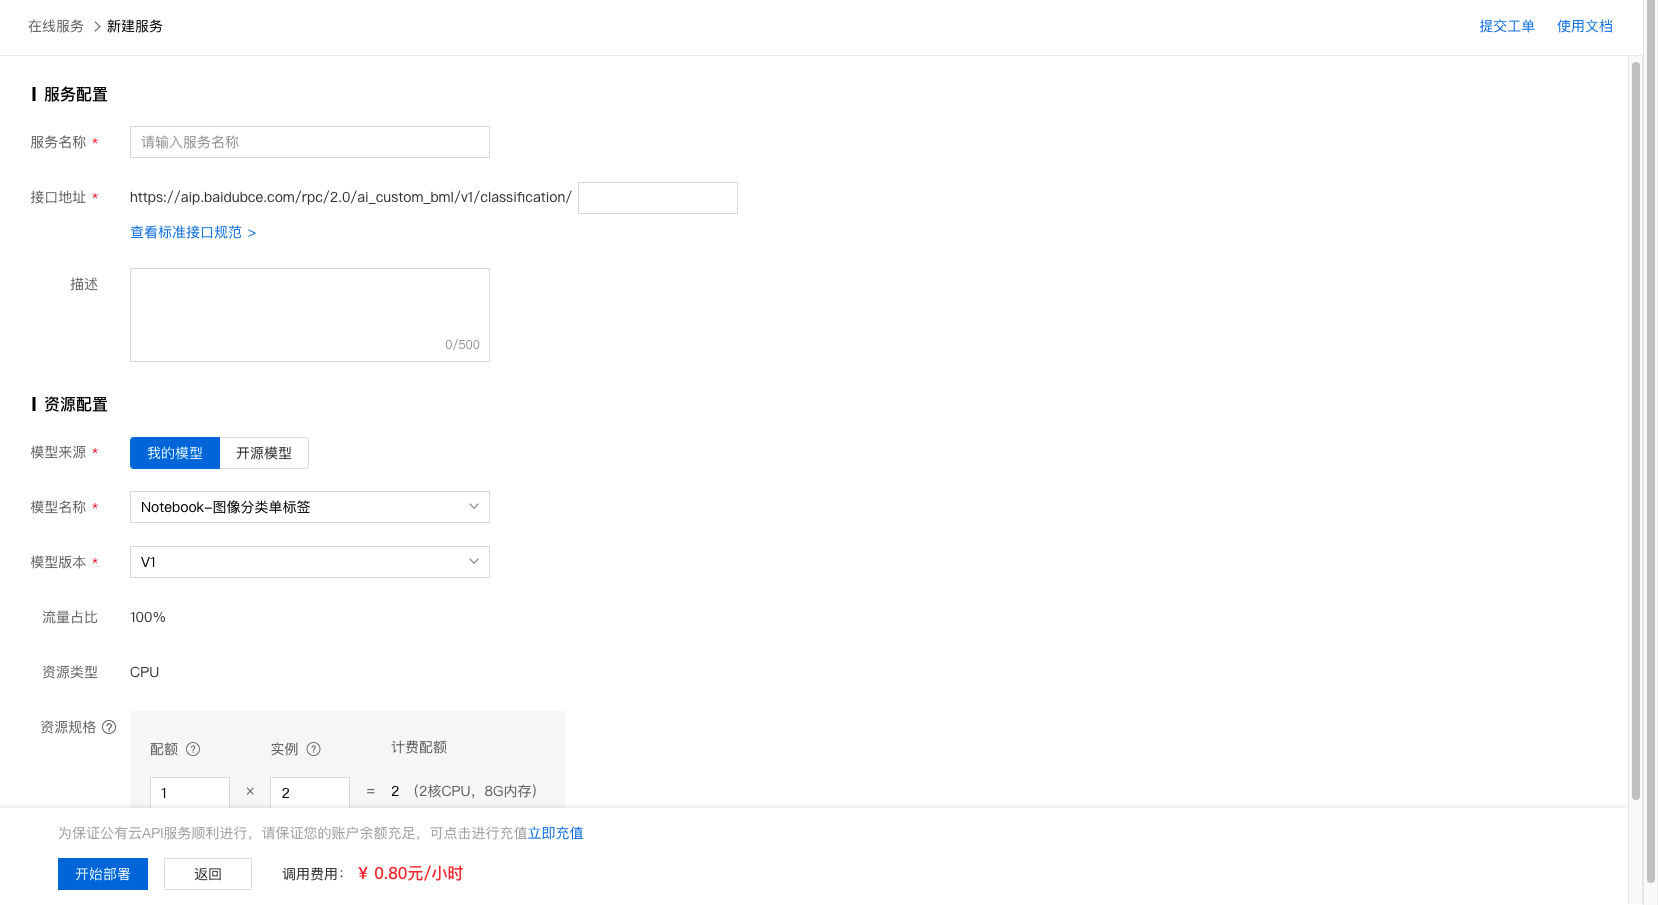
4、部署过程需要数十秒时间,请耐心等待。部署完成后,示例如下:

5、API调用方法请参考 公有云部署管理。
总结
-
更多丰富的内容与示例可以参考PaddleDetection的github与教程文档。
- PaddleDetection github地址:https://github.com/PaddlePaddle/PaddleDetection/
- PaddleDetection教程文档地址:https://github.com/PaddlePaddle/PaddleDetection/blob/release/2.3/docs/tutorials/GETTING_STARTED_cn.md
- 如果在使用PaddleDetection的过程中遇到问题,欢迎去PaddleDetection的github上提issue:https://github.com/PaddlePaddle/PaddleDetection/issues/new