
文档简介:


公共镜像转私有镜像Linux系统安装配置cloud-init
适用于杭州、广州节点
1、获取cloud-init网络安装地址,以下为包含的几个公共镜像
|
操作系统类型 |
版本 |
网络安装地址 |
|
CentOS、RedHat或Oracle Linux |
7系列 |
|
|
6系列64位 |
||
|
Ubuntu 14.04 |
deb /ubuntu/ trusty main restricted universe multiverse deb /ubuntu/ trusty-security main restricted universe multiverse deb /ubuntu/ trusty-updates main restricted universe multiverse deb /ubuntu/ trusty-proposed main restricted universe multiverse deb /ubuntu/ trusty-backports main restricted universe multiverse deb-src /ubuntu/ trusty main restricted universe multiverse deb-src /ubuntu/ trusty-security main restricted universe multiverse deb-src /ubuntu/ trusty-updates main restricted universe multiverse deb-src /ubuntu/ trusty-proposed main restricted universe multiverse deb-src /ubuntu/ trusty-backports main restricted universe multiverse |
|
|
Ubuntu 16.04 |
deb /ubuntu/ xenial main restricted universe multiverse deb /ubuntu/ xenial-security main restricted universe multiverse deb /ubuntu/ xenial-updates main restricted universe multiverse deb /ubuntu/ xenial-proposed main restricted universe multiverse deb /ubuntu/ xenial-backports main restricted universe multiverse deb-src /ubuntu/ xenial main restricted universe multiverse deb-src /ubuntu/ xenial-security main restricted universe multiverse deb-src /ubuntu/ xenial-updates main restricted universe multiverse deb-src /ubuntu/ xenial-proposed main restricted universe multiverse deb-src /ubuntu/ xenial-backports main restricted universe multiverse |
|
2、CentOS系统epel安装
ü 6系列以上的系统模板,执行如下yum install /pub/epel/6/x86_64/epel-release-6-8.noarch.rpm -y 安装epel源
ü 7系列以上的系统模板,执行yum install /pub/epel/7/x86_64/e/epel-release-7-9.noarch.rpm -y
ü 如果为Ubuntu系统,默认可直接安装cloud-init软件包
3、安装cloud-init软件包
ü CentOS系统安装cloud-init
yum –y clean all;yum –y install cloud-* ;yum –y install cloud-init
ü Ubuntu系统安装cloud-init
apt-get install cloud-*;apt-get install cloud-init
4、检查cloud-init版本与状态,如显示版本信息,则说明安装正常
cloud-init –v;cloud-init init –local

5、修改/etc/cloud/cloud.cfg配置文件
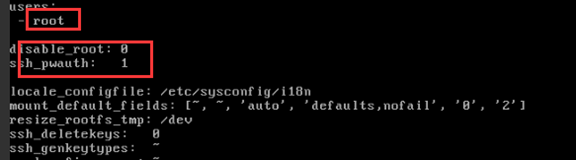
ü CentOS系统修改cloud.cfg,修改defaults为root、disable_root: 1为0、ssh_pwauth: 0为1
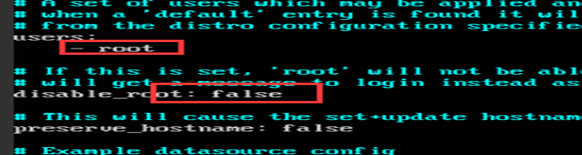
ü Ubuntu系统修改cloud.cfg,修改defaults为root、disable_root: true为false
6、修改/etc/ssh/sshd_config配置文件,开启允许密码认证功能PasswordAuthentication为yes,关闭允许质疑-应答ChallengeResponseAuthentication 为no;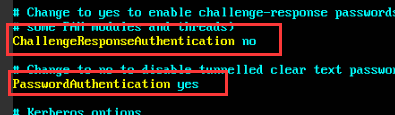
7、删除原有Linux系统的 /bin/bash /etc/init.d/setpasswd.sh配置,
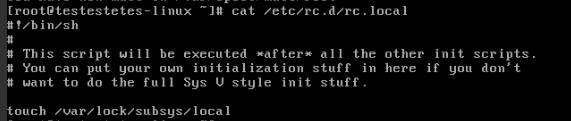
ü CentOS系统配置 vi /etc/rc.d/rc.local, 查看是否存在/bin/bash /etc/init.d/setpasswd.sh配置,若存在,删除保存即可
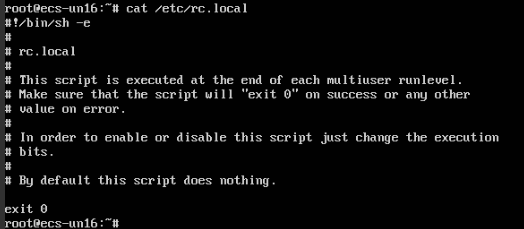
ü Ubuntu系统配置:vi /etc/rc.local, 查看是否存在/bin/bash /etc/init.d/setpasswd.sh配置,若存在,删除保存即可
8、重启ssh服务
ü CentOS6系列启动方式
/etc/init.d/sshd restart
ü CentOS7系列启动方式
systemctl restart sshd.service
ü Ubuntu系统启动方式
/etc/init.d/ssh restart
9、启动cloud-init进程并配置开机自启动服务
ü CentOS 6系统启动cloud-init相关进程并开启开机自启动服务
service cloud-init-local start; service cloud-init start; service cloud-config start; service cloud-final start
chkconfig cloud-init-local on; chkconfig cloud-init on; chkconfig cloud-config on; chkconfig cloud-final on
service cloud-init-local status; service cloud-init status; service cloud-config status; service cloud-final status
ü CentOS 7系统启动cloud-init相关进程并开启开机自启动服务
systemctl start cloud-init-local.service cloud-init.service cloud-config.service cloud-final.service
systemctl enable cloud-init-local.service cloud-init.service cloud-config.service cloud-final.service
systemctl status cloud-init-local.service cloud-init.service cloud-config.service cloud-final.service
ü Ubuntu系统启动cloud-init相关进程并开启开机自启动服务
service cloud-init-local start; service cloud-init start; service cloud-config start; service cloud-final start
sysv-rc-conf --level 0123456S cloud-init-local on;sysv-rc-conf --level 0123456S cloud-init on;sysv-rc-conf --level 0123456S cloud-config on;sysv-rc-conf --level 0123456S cloud-final on
service cloud-init-local status; service cloud-init status; service cloud-config status; service cloud-final status
10、清除系统残留数据信息,执行如下命令即可
rm -rf /etc/sysconfig/network-scripts/*bak && rm -rf /software /var/log/* /var/lib/cloud 2>&1 && cd /var/log && touch btmp lastlog && chmod 644 btmp && chown root:utmp btmp && chmod 000 lastlog && rm -rf /root/.ssh/* && > /root/.bash_history && history –c
安装验证
-
在虚机重启或者正常启动的情况下,使用原有密码登陆原有虚机是否正常。若正常,说明安装无误;若异常,请直接联系运维人员协助处理。
-
用安装cloud-init后的私有镜像创建虚机,使用其密码或秘钥对登陆测试,若正常,说明安装无误;若异常,请直接联系运维人员协助处理。
-
验证重装或者切换操作系统使用密钥对是否可正常登陆,若正常,说明安装无误;若异常,请直接联系运维人员协助处理。